Top 10 ₹500 Sensor Hack Will Make You Feel Like Tony Stark
Summary
The world of electronics has evolved dramatically, making advanced technology accessible to enthusiasts and creators everywhere.
Budget tech projects using Arduino sensors for beginners have opened unprecedented possibilities for anyone interested in building smart gadgets at home.
With simple IoT sensor projects costing less than ₹500, you can now replicate iconic superhero abilities through creative electronics ideas that combine affordable components with imaginative engineering.
This fusion of entertainment and education transforms basic electronic modules into extraordinary wearable devices that bring Marvel's greatest heroes to life.

Top 10 ₹500 Sensor Hack Will Make You Feel Like Tony Stark
Here are the top 10 projects that you can make using sensors under 500 that will make you feel like a Marvel superhero.
1. Iron Man's Repulsor with Motion Sensor
Create a glove that lights up when you move your hand. It won't shoot lasers, but it will look cool and teach you about motion sensors using the MPU6050, a sophisticated module combining a 3-axis accelerometer and 3-axis gyroscope.
Inspired by Tony Stark's iconic repulsor blasts, this Iron Man inspired gadget demonstrates gesture control using sensors in an accessible DIY sensor project.
Concept: A basic Arduino sensor project that uses a motion sensor to activate an LED, teaching fundamentals of motion detection and wearable electronics.
Components:
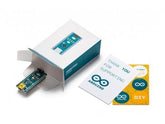
- Arduino Nano (approx. ₹200–₹300)
- MPU6050 Motion Sensor - accelerometer and gyroscope (approx. ₹150–₹200)
- Bright white or blue LED (₹10)
- 9V battery with connector (₹50)
- Cardboard and red craft paint for the glove casing (reused materials)
How it works:
- The MPU6050 sensor detects the specific motion of your hand, such as a forward flick of the wrist, using its 3-axis accelerometer and gyroscope
- The sensor sends a digital signal through the I2C protocol to the Arduino boards
- The Arduino processes the motion data and tells the LED to turn on for a few seconds
- The components can be mounted inside a cardboard glove decorated to look like Iron Man's iconic armor
- The MPU6050's 16-bit analog-to-digital converter ensures high accuracy when detecting specific gestures
2. Spider-Man's "Spidey-Sense" Wristband
Build a simple wristband that vibrates when an object gets too close, similar to Spider-Man's early-warning system.
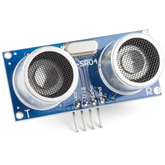
This budget tech project uses an ultrasonic sensor to detect nearby objects and trigger a vibration motor, creating your own proximity detection system. The HC-SR04 ultrasonic sensor forms the foundation of this low cost electronics project.
Concept: This Arduino sensor project uses an ultrasonic sensor to detect nearby objects and trigger a vibration motor for haptic feedback.
Components:
- Arduino Nano (approx. ₹200–₹300)
- HC-SR04 Ultrasonic Sensor (approx. ₹50)
- Vibration motor (₹20–₹40)
- 9V battery with connector (₹50)
- A wristband or small project enclosure (reused materials)
How it works:
- The ultrasonic sensor constantly sends out sound waves at 40KHz frequency and receives reflected waves
- When an object enters a specified range (e.g., 50 cm), the sensor measures the time difference between transmission and reception
- The Arduino calculates distance using the formula: distance = duration × 0.034 / 2
- The Arduino activates the vibration motor when objects are detected, giving you a "tingle" to alert you
- The HC-SR04 can measure distances from 2cm to 400cm with 3mm accuracy
3. Thor's LED Hammer with Touch Sensor
Construct a miniature version of Mjolnir that lights up when you touch the handle. This simple IoT sensor project uses capacitive touch technology to create an interactive experience in DIY wearable tech.
An LED light is activated by touching a metal strip that acts as a touch sensor, demonstrating how to make smart gadgets at home.
Concept: An LED light is activated by touching a metal strip that acts as a simple capacitive touch sensor.
Components:
- Arduino Nano (approx. ₹200–₹300)
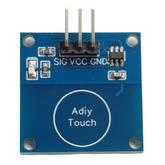
- TTP223 Capacitive Touch Sensor (approx. ₹25)
- Bright LED (₹10)
- 9V battery with connector (₹50)
- Cardboard and foam for the hammer shape (reused materials)
- Aluminum foil for the touch trigger (household material)
How it works:
- The touch sensor is connected to a piece of aluminum foil on the hammer's handle
- Touching the foil with your finger changes the sensor's capacitance field, which the TTP223 detects
- The sensor sends a digital HIGH signal to the Arduino when contact is detected
- The Arduino turns the LED on or off based on your touch using basic Arduino coding basics
- The TTP223 operates across 2.0V to 5.5V, ensuring reliable operation with minimal power consumption
4. Black Widow's Smart Gauntlet with Light Sensor
Design a wrist-mounted device that automatically activates LEDs when you enter a dark room, mimicking Black Widow's tactical awareness.
This IoT sensor project uses a photoresistor (LDR) to detect ambient light levels and trigger illumination when needed. The light-dependent resistor changes resistance based on light intensity, making it perfect for automatic lighting systems.
Concept: A light-sensing wristband that automatically illuminates in low-light conditions using a photoresistor sensor.
Components:
- Arduino Nano (approx. ₹200–₹300)
- LDR Photoresistor Sensor Module (approx. ₹30–₹50)
- Red LED lights (₹20 for multiple)
- 9V battery with connector (₹50)
- Black wristband or cardboard casing (reused materials)
How it works:
- The LDR sensor continuously monitors ambient light levels by changing its resistance
- When light intensity drops below a threshold value, the sensor's resistance increases
- The Arduino reads the analog voltage change and compares it to programmed light thresholds
- Once the darkness threshold is reached, the Arduino activates the red LEDs automatically
- The device can be calibrated for different sensitivity levels based on user preferences
5. Captain America's Shield Alarm with Sound Sensor
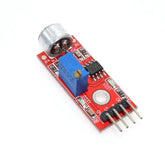
Build a defensive system that triggers an alarm when loud sounds are detected, similar to Captain America's vigilance. This budget tech project uses a sound sensor module to monitor audio levels and activate a buzzer alert system.
The microphone-based sensor detects sound intensity, making it ideal for security and alert applications.
Concept: A sound-activated alarm system using a microphone sensor module to detect loud noises and trigger alerts.
Components:
- Arduino Nano (approx. ₹200–₹300)
- Sound Sensor Module (KY-038) (approx. ₹50–₹80)
- Piezo buzzer (₹20–₹30)
- 9V battery with connector (₹50)
- Cardboard shield decoration (reused materials)
How it works:
- The sound sensor's microphone continuously monitors environmental noise levels
- When sound exceeds the preset threshold (adjustable via potentiometer), the sensor outputs a digital signal
- The Arduino receives this trigger signal and activates the piezo buzzer
- The alarm can be programmed to sound for a specific duration or until manually reset
- Sensitivity can be adjusted to ignore background noise while detecting significant sounds
6. Hulk's Anger Monitor with Temperature Sensor
Create a device that changes LED colors based on temperature, representing the Hulk's transformation when things heat up.
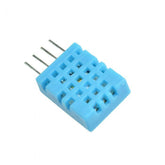
This DIY sensor project uses the DHT11 temperature sensor to measure environmental heat and display visual feedback. The color-changing LEDs provide an intuitive representation of temperature ranges.
Concept: A temperature-sensing device that changes LED colors to represent different heat levels, teaching thermal monitoring concepts.
Components:
- Arduino Nano (approx. ₹200–₹300)
- DHT11 Temperature Sensor (approx. ₹100–₹120)
- RGB LED or multiple colored LEDs (₹20–₹40)
- 9V battery with connector (₹50)
- Small project enclosure (reused materials)
How it works:
- The DHT11 sensor continuously measures ambient temperature from 0-50°C
- Temperature data is transmitted to the Arduino through a single-wire digital interface
- The Arduino processes temperature readings and maps them to different LED colors
- Green LEDs illuminate at cool temperatures, yellow at moderate, and red at high temperatures
- The DHT11's built-in NTC thermistor ensures accurate measurements with fast response time
7. Doctor Strange's Portal Detector with PIR Motion Sensor
Construct a motion-activated light system that illuminates when someone approaches, like detecting interdimensional portals. This simple IoT project uses a Passive Infrared (PIR) sensor to detect human movement through infrared radiation changes. The PIR sensor is one of the most affordable robotics components for motion detection applications.
Concept: A motion detection system using PIR sensor technology to automatically activate lighting when movement is detected.
Components:
- Arduino Nano (approx. ₹200–₹300)
- PIR Motion Sensor (HC-SR501) (approx. ₹80–₹100)
- LED strip or bright LEDs (₹50–₹80)
- 9V battery with connector (₹50)
- Decorative circular frame (reused materials)
How it works:
- The PIR sensor detects infrared radiation emitted by warm bodies in its detection range
- When motion is detected, the sensor outputs a HIGH signal to the Arduino
- The Arduino activates the LED lights, creating an illuminated portal effect
- The sensor has adjustable sensitivity and time delay settings via built-in potentiometers
- Detection range typically extends 3-7 meters depending on sensor positioning
8. Ant-Man's Size Indicator with Flex Sensor
Design a wearable device that displays different light patterns based on finger flexing, representing Ant-Man's size-changing abilities.
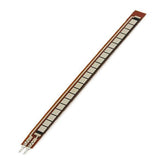
This DIY wearable tech project uses a flex sensor that changes resistance when bent. The variable resistance creates analog signals that can be mapped to different visual outputs.
Concept: A flex sensor-based project that detects finger bending and translates it into LED patterns.
Components:
- Arduino Nano (approx. ₹200–₹300)
- Flex Sensor (2.2" or 4.5") (approx. ₹150–₹200)
- Multiple LEDs in sequence (₹30)
- 10kΩ resistor (₹5)
- 9V battery with connector (₹50)
- Glove or finger mount (reused materials)
How it works:
- The flex sensor is attached to a glove finger and changes resistance when bent
- As the finger flexes, resistance increases proportionally to the bend angle
- The Arduino reads the analog voltage change through a voltage divider circuit
- Different flex levels trigger different numbers of LEDs to illuminate in sequence
- Full flex could represent miniaturization, while straight represents giant size
9. Black Panther's Vibranium Energy Display with Tilt Sensor
Build an energy absorption visualization system using a tilt sensor that activates LEDs when tilted, like Black Panther's vibranium suit storing kinetic energy.
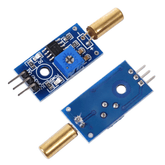
This Arduino sensor project uses an SW-520D tilt sensor or mercury switch to detect orientation changes. The simple on-off switching mechanism makes it perfect for tech hacks for beginners.
Concept: A tilt-sensing device that activates visual effects when moved, demonstrating basic orientation detection.
Components:
- Arduino Nano (approx. ₹200–₹300)
- Tilt Sensor Module (SW-520D) (approx. ₹20–₹30)
- Purple LEDs (₹20)
- 9V battery with connector (₹50)
- Small wearable enclosure painted black (reused materials)
How it works:
- The tilt sensor contains a conductive ball that completes a circuit when tilted beyond a certain angle
- When the device is tilted, the sensor sends a digital signal to the Arduino
- The Arduino activates purple LEDs with increasing brightness to simulate energy buildup
- Returning to level position could trigger a bright flash representing energy release
- Multiple tilt sensors can be positioned at different angles for more complex detection
10. Vision's Mind Stone with Color Sensor
Create an intelligent device that identifies object colors and displays them through RGB LEDs, mimicking Vision's analytical abilities.
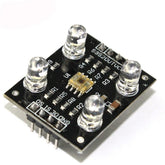
This IoT sensor project uses a TCS3200 color sensor to detect RGB values of objects placed near it. The sensor converts light frequency to electrical signals that the Arduino can interpret.
Concept: A color detection system that reads object colors and replicates them through RGB LED display.
Components:
- Arduino Nano (approx. ₹200–₹300)
- TCS3200 Color Sensor Module (approx. ₹150–₹180)
- RGB LED module (₹30–₹50)
- 9V battery with connector (₹50)
- Yellow/gold decorative casing (reused materials)
How it works:
- The TCS3200 sensor illuminates objects with white LEDs and measures reflected light
- Internal photodiodes with RGB filters detect different color wavelengths
- The sensor outputs square waves with frequency proportional to light intensity for each color
- The Arduino reads these frequencies and calculates RGB values
- The RGB LED displays the detected color, creating a color-matching effect
Best Arduino Sensors You Can Buy Under ₹500
HC-SR04 Ultrasonic Distance Sensor

The HC-SR04 represents one of the most popular best sensors under ₹500 for measuring distance and creating obstacle-avoidance systems in affordable robotics components.
Available for approximately ₹50-₹73 in India, this sensor provides non-contact distance measurement from 2cm to 400cm with exceptional 3mm accuracy.
Its dual ultrasonic transducer design—one for transmission at 40KHz and one for reception—enables accurate spatial awareness in home automation projects.
The four-pin configuration (Ground, VCC, Trigger, and Echo) connects easily to Arduino digital pins, making it ideal for tech hacks for beginners.
DHT11 Temperature and Humidity Sensor

The DHT11 module delivers dual environmental monitoring capabilities at around ₹117, making it essential for Arduino sensors for beginners interested in climate control and simple IoT projects for students.
This digital sensor uses a capacitive humidity sensor and thermistor to measure relative humidity (20-90% RH) and temperature (0-50°C) through a single-wire serial interface.
The included NTC temperature measurement component and resistive-type humidity sensor connect to a high-performance 8-bit microcontroller that ensures fast response and anti-interference capability.
Its operating voltage range of 3-5V and low power consumption of 2.5mA maximum make it perfect for battery-powered Raspberry Pi sensor projects.
MPU6050 Gyroscope and Accelerometer

The MPU6050 combines 3-axis gyroscope and 3-axis accelerometer functionality in a single module priced between ₹150-₹200, representing excellent value in IoT sensor project components.
This MEMS-based sensor excels in motion tracking applications for creative electronics ideas, from self-balancing robots to drone stabilization systems.
Its built-in Digital Motion Processor (DMP) offloads complex calculations from the microcontroller, enabling sophisticated gesture control using sensors and orientation tracking.
The MPU6050 operates on 3-5V power supply and communicates through the I2C protocol with a built-in 16-bit analog-to-digital converter for high accuracy.
TTP223 Capacitive Touch Sensor

At approximately ₹25, the TTP223 offers the most cost-effective solution for adding touch interfaces to tech hacks for beginners and build your own smart gadget projects.
This single-pad touch sensor detects human contact through capacitance changes, eliminating the need for mechanical switches in DIY wearable tech applications.
Its compatibility with 2.0-5.5V power supplies and minimal external component requirements make it perfect for portable electronics.
The three-pin design (OUT, VCC, GND) simplifies connection, while its built-in power-on reset circuit ensures reliable operation during startup.
MQ-135 Gas Sensor Module

The MQ-135 gas sensor module costs around ₹135 and detects various air quality parameters, making it valuable for environmental monitoring in simple IoT projects for students and home automation projects.
This sensor responds to ammonia, sulfide, benzene, smoke, and other harmful gases, enabling the creation of air quality monitors and safety systems for creative electronics ideas.
When combined with Arduino boards, the MQ-135 facilitates automated responses to environmental changes, teaching students about sensor integration in real-world applications.
The module's analog output connects to Arduino analog pins, making it accessible for Arduino sensors for beginners learning about gas detection technology.
Conclusion
The intersection of affordable electronics and creative imagination has made superhero-inspired technology accessible to everyone willing to experiment with Arduino sensor projects.
These budget-friendly components demonstrate that innovation doesn't require expensive equipment—just curiosity and determination to transform simple modules into extraordinary gadgets through DIY sensor project techniques.
Whether building motion-sensing gloves, proximity-detecting wristbands, or touch-activated props, each project teaches valuable skills in electronics, programming, and problem-solving that extend far beyond entertainment value.
The democratization of technology through low-cost sensors empowers a new generation of makers to explore Raspberry Pi sensor projects, IoT applications, and robotics without financial barriers.
By starting with these fundamental builds using best sensors under ₹500, aspiring engineers develop the confidence and competence to tackle increasingly complex challenges in home automation projects and creative electronics ideas.
This hands-on approach to learning Arduino coding basics ultimately contributes to the broader maker community and advances technical capabilities in meaningful ways


