How to Set Up and Print with Bambu Lab A1 Mini
Summary
After years in the 3D printing space, you get used to a certain level of tinkering. So, when I heard about the Bambu Lab A1 Mini's promise of a "plug-and-play" experience, I was skeptical but ready to give it a try.
This guide is a detailed walkthrough of my experience, from unboxing to the first print, designed to show you exactly what to expect.
We'll cover the core features that set this machine apart, what comes in the box, and a precise step-by-step guide to get you up and running.
If you're looking for a 3D printer that respects your time and delivers on its promises, this is for you.

What is the Bambu Lab A1 Mini?
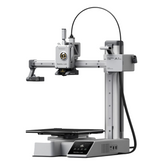
The A1 Mini is Bambu Lab's effort to bring its high-end, automated printing technology to a more compact and affordable price point.
It’s built around a suite of features designed to eliminate the most common 3D printing frustrations.
What defines the A1 Mini is its onboard intelligence. It's a system that actively manages the printing process.
The goal is to remove manual calibration and guesswork, making it accessible for beginners while still offering the quality seasoned users demand.
Key features I found impressive during my hands-on time:

- Fully Automated Calibration: Before each print, the A1 Mini automatically handles bed leveling, Z-offset, and vibration resonance checks. This is a hands-off process that ensures a perfect first layer every time.
- Active Flow Rate Compensation: An Eddy Current sensor monitors nozzle pressure in real time. This allows the printer to make micro-adjustments to filament flow, resulting in sharper corners and more consistent extrusion.
- Quick-Swap Nozzle Design: The entire hotend assembly can be replaced in under a minute without tools. A single push-clip mechanism releases the unit, making nozzle changes or maintenance incredibly simple.
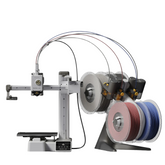
- AMS Lite Multi-Color System: The optional AMS Lite unit enables reliable four-color printing. It feeds filament from four separate spools and manages material changes automatically. For multi-color work, this system is a standout feature.
- Active Motor Noise Cancellation: The printer runs a calibration sequence to identify and cancel out harsh motor frequencies, reducing its operational noise to below 48 dB in silent mode, making it suitable for a home office.
What’s Inside the Box

The Bambu Lab A1 Mini unboxing is straightforward and well-organized, reflecting a focus on user experience. Everything is secured and logically arranged for a quick setup.
Here is a clear breakdown of the contents:
- Main Printer Components: The A1 Mini Base and the Vertical Gantry Frame are the two largest parts.
- AMS Lite Unit (Combo Version): This includes the central feeder hub, a stand for the unit, and four rotary spool holders.
Accessories & Tools:
- Power Cable
- Standard single-spool holder for non-AMS use
- PTFE tubes and organizer
- Sample spools of Bambu Lab PLA filament
- A nozzle cleaning tool and Allen keys
- A pre-printed quality test model (Benchy)
- A 3D printed filament scraper
Documentation: A Quick Start Guide with clear, visual instructions.
Step-by-Step Assembly Guide
The entire Bambu Lab A1 Mini setup is engineered for speed and clarity. Here is a detailed breakdown of the process to get your machine ready for its first 3D print.
Step 1: Unboxing and Initial Preparation

First, place all the contents from the box on a clean, stable surface. You’ll find the main printer base, the vertical gantry, and a box of accessories.
Inside this accessory box, locate the small toolkit which includes two Allen wrenches; you will need the larger of the two for the first step.
Step 2: Removing the Shipping Bracket

This is the most critical step of the physical assembly. For transit, the print bed is secured by a metal bracket held in place by four screws. Turn the printer base around to access this bracket.
Use the larger Allen wrench to remove all four screws—two on the outer edge and two on the inside. Once the screws are removed, the bracket will come off easily.
Do not power on the printer without removing this bracket as it will prevent the bed from moving and could damage the machine.
Step 3: Gantry and Purge Wiper Installation

Now, take the vertical gantry frame and slide it into the designated slot at the back of the printer base. It’s designed to fit snugly in only one orientation.
Once it's fully seated, lay the printer on its side to access the bottom, and secure the gantry with the four larger screws from your kit.
Next, locate the small, black plastic purge wiper. This component is essential for clean color changes.
It slides onto a dedicated mount on the left side of the build plate assembly and is secured with a single, clearly labeled screw.
Step 4: Assembling the Spool Holder and Filament Buffer

If you are not using the AMS lite, you will use the single spool holder. This component clips directly onto the back of the gantry frame.
Next, attach the filament buffer to the frame, just below the spool holder. This small box acts as an intermediary for the filament path.
Step 5: Connecting the Electronics

With the main assembly complete, it's time for the connections.
- Toolhead Cable: Take the main ribbon cable coming from the toolhead and plug it into the corresponding port on the printer base. It's a large connector and can only be inserted one way.
- PTFE Tube: Connect the main PTFE tube (the guide for the filament) from the toolhead to the output port of the filament buffer you just installed.
- Power: Plug the power cord into the back of the printer and then into a wall outlet.
Step 6: Power On and Guided Wi-Fi Setup

Flip the power switch at the back of the printer. The touchscreen will light up and the Bambu Lab A1 Mini setup wizard will begin.
- Initial Prompts: You will first be asked to select your language and region.
- Wi-Fi Connection: The next screen will prompt you to connect to your Wi-Fi network. While you can technically skip this, connecting to Wi-Fi is highly recommended as it enables you to send prints from your computer via Bambu Studio and monitor your printer from anywhere using the Bambu Handy app on your phone.
- Binding Your Printer: After connecting to Wi-Fi, the screen will display a QR code. Open the Bambu Handy app on your phone, select "Add Printer," and scan the QR code to bind the A1 Mini to your account.
Step 7: Automated Calibration

Once the initial setup is complete, the printer will insist on running a full calibration, which takes about 15-20 minutes. Just press "Start" and let the machine do its work. During this process, you will see it perform:
- Vibration Resonance Test: The toolhead will move rapidly to measure the printer's resonant frequencies to enable active motor noise cancellation.
- Auto Bed Leveling: The nozzle will gently tap the print plate in a grid pattern to create a detailed mesh of the surface, ensuring a perfect first layer.
- Nozzle Pressure Advance Calibration: This is part of the system that enables active flow rate compensation.
Step 8: Loading Filament

After calibration, the screen will prompt you to load filament.
- Using the Single Spool Holder: Place your spool on the holder. Take the end of the filament, ensure it has a clean-cut tip, and feed it into the intake port of the filament buffer. On the touchscreen, select "Load," and the printer's extruder gears will pull the filament through the tube to the nozzle.
- Using the AMS Lite (if you have the combo): Place your spools on the four rotary spindles of the AMS unit. Feed the end of each filament into the corresponding inlet port on the AMS hub. The system will automatically detect the filament and load it. If you're using official Bambu Lab filament, the RFID tag on the spool will even tell the printer the exact color and material type automatically.
Step 9: Launching Your First 3D Print

The moment has arrived. The printer's internal storage comes with pre-sliced files ready for printing.
- From the home screen, navigate to the "Print Files" menu.
- Select the "Benchy" model. This small boat is a universal benchmark for testing a 3D printer's capabilities.
- If you have the AMS, you will be asked to confirm which color you want to use.
- Press "Print."
The A1 Mini will perform one last, very quick calibration and then spring to life.
Conclusion
The Bambu Lab A1 Mini delivers on its promise of a streamlined 3D printing experience.
The Bambu Lab A1 Mini setup process is the fastest and most user-friendly I have encountered, shifting the focus from technical troubleshooting to immediate creative output.
Its combination of automated calibration, high-speed printing, and accessible multi-color capabilities through the AMS Lite makes it a powerful tool.
For anyone who has been hesitant to enter the world of 3D printing due to its perceived complexity, the A1 Mini effectively removes those barriers.
It's a highly capable 3D printer that proves advanced features and user-friendliness can coexist.


