How to Monitor Water Quality Using the DFRobot pH Sensor Module
Summary
Have you ever wondered about the quality of the water you use every day? Whether you're a homebrewer perfecting your craft, a hydroponics enthusiast nurturing your plants, or simply a curious mind wanting to understand the environment, monitoring water pH is a fundamental step.
After countless hours spent on various water-based projects, I've come to rely on specific tools that make the complex science of water chemistry accessible to everyone. This is where the DFRobot pH Sensor comes into play, a fantastic tool for any sensor project.
In this comprehensive walkthrough, we'll embark on a journey to build our very own Arduino-based water quality monitoring system. Forget complicated setups and intimidating manuals.
I’ll guide you step-by-step, sharing the tips and tricks I've learned along the way to get you from unboxing to accurate readings in no time. This is one of those simple Arduino projects with sensors that has a huge impact.
Whether you're a seasoned maker or just starting with your first Arduino, this guide will provide you with the confidence to tackle this exciting water sensor project.

What is the DFRobot pH Sensor Module?
When I first started exploring water quality monitoring, I was looking for a reliable and easy-to-use solution. That's when I discovered the DFRobot pH Sensor Module.
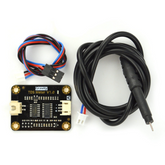
This isn't just a simple sensor; it's a complete package designed for seamless integration with microcontrollers like Arduino. My experience with this particular water ph sensor has been overwhelmingly positive, mainly due to its robust design and user-friendly features.
The module comes with an industrial-grade pH probe that is both accurate and durable, a crucial factor when you're dealing with continuous monitoring. One of the things that stands out for me is its simplicity.
The included signal conversion board takes the complex analog signal from the probe and converts it into a voltage that an Arduino can easily understand.
This thoughtful design eliminates a lot of the electrical noise and complexity that can plague DIY sensor setups. The DFRobot pH Sensor is more than just a piece of hardware; it’s a gateway to understanding the chemical world around us.
Here are some of the standout features that I've found particularly useful in my projects:
- Wide pH Range: The sensor can measure a pH range from 0 to 14, covering everything from highly acidic to strongly alkaline solutions.
- High Accuracy: It boasts an accuracy of ±0.1pH at 25°C, which is more than sufficient for most hobbyist and even some professional applications.
- Simple Connectivity: With its Gravity interface, connecting the sensor to an Arduino is as simple as plugging in a single cable. The ph sensor pinout is clearly labeled, making it foolproof.
- Onboard Voltage Regulator: The board includes a voltage regulator, which ensures a stable power supply to the sensor, leading to more consistent and reliable readings.
- LED Power Indicator: A small but incredibly useful feature is the onboard power indicator, which lets you know at a glance if the module is receiving power.
This ph sensor module has become a go-to in my toolkit for any project involving water quality. The reliability and ease of use of the DFRobot pH Sensor make it an excellent choice for anyone serious about getting accurate pH measurements with their Arduino.
Working Principle of a pH Sensor

To truly appreciate the DFRobot pH Sensor, it helps to understand a little bit about the magic happening behind the scenes.
The core of any ph sensor working principle lies in electrochemistry. I remember being fascinated when I first learned how it all connects.
At its heart, a pH probe is an electrochemical sensor that measures the activity of hydrogen ions in a solution. It consists of two main electrodes: a measuring electrode and a reference electrode.
- The Measuring Electrode: This part is typically a glass bulb made of a special type of glass that is permeable to hydrogen ions. When you dip the probe into a solution, hydrogen ions from the solution accumulate on the outside of the bulb, while a solution with a fixed pH inside the bulb has a constant concentration of hydrogen ions. This difference in ion concentration across the glass membrane creates a small voltage. The magnitude of this voltage is directly proportional to the pH of the solution you are testing.
- The Reference Electrode: To measure the tiny voltage produced by the measuring electrode, you need a stable reference point. That's the job of the reference electrode. It's usually made of a silver wire coated with silver chloride (Ag/AgCl) and is immersed in a solution with a constant concentration of potassium chloride (KCl). This electrode produces a stable, known voltage, providing the necessary baseline to compare against the voltage from the measuring electrode.
The DFRobot pH Sensor module's conversion board takes the very small voltage difference generated between these two electrodes, amplifies it, and converts it into a signal that is easy for your Arduino to read.
The process of ph sensor calibration procedure is what fine-tunes this conversion, ensuring that the voltage your Arduino sees accurately corresponds to the pH of the water. This elegant principle is what allows a simple device to give us such powerful insights into water quality.
Circuit Diagram

Connecting the DFRobot pH Sensor to your Arduino is incredibly straightforward, which is one of the reasons I recommend it so highly for beginners and for any Arduino based projects.
Thanks to the Gravity interface, you don't have to mess around with breadboards or soldering. The connections are clean and simple.
Here’s a simple breakdown of the connections as shown in the diagram below:
- First, securely connect the pH probe to the BNC connector on the Gravity pH Meter V2.0 board.
- Next, take the 3-wire Gravity sensor cable.
- Connect the Red wire (VCC) to the 5V pin on your Arduino.
- Connect the Black wire (GND) to any GND pin on your Arduino.
- Connect the Blue wire (Signal) to an analog input pin on your Arduino. In this setup, we are using pin A0.
- That's it! The wiring is complete. The visual below gives you a clear picture of this simple setup.
Arduino Code
Now for the part where we bring our hardware to life! Writing the ph sensor code for Arduino is a rewarding step. The code we'll use reads the analog voltage from the sensor, converts it into a pH value, and displays it on the Serial Monitor.
One of the first things you'll do is the ph sensor calibration procedure, which is essential for accurate readings.
Below is a well-commented sketch that will get you started. I've broken down the logic so you can understand how to use ph sensor with arduino effectively.
/*
# DFRobot Gravity: Analog pH Sensor/Meter Kit V2
# SKU: SEN0161-V2
# This sample code is for testing the pH meter.
# Editor: DFRobot
# Ver: 1.0
# Product Link: https://www.dfrobot.com/product-1025.html
# Wiki: https://wiki.dfrobot.com/Gravity__Analog_pH_Sensor_Meter_Kit_V2_SKU_SEN0161-V2
*/

#define SENSOR_PIN A0            // pH meter Analog output to Arduino Analog Input 0
#define OFFSET 0.00              // Deviation compensation
#define LED 13                   // Power Indication LED
#define SAMPLING_INTERVAL 20
#define PRINT_INTERVAL 800
#define ARRAY_LENGTH 40          // Number of samples for averaging

int ph_array[ARRAY_LENGTH];      // Store the analog value in the array, read from the sensor
int ph_array_index = 0;

void setup(void) {
  pinMode(LED, OUTPUT);
  Serial.begin(9600);
  Serial.println("pH sensor is ready!");
  Serial.println("Note: Please calibrate the sensor before use.");
}

void loop(void) {
  static unsigned long sampling_time = millis();
  static unsigned long print_time = millis();
  static float ph_value, voltage;

  if (millis() - sampling_time > SAMPLING_INTERVAL) {
    ph_array[ph_array_index++] = analogRead(SENSOR_PIN);
    if (ph_array_index == ARRAY_LENGTH) {
      ph_array_index = 0;
    }
    voltage = avergearray(ph_array, ARRAY_LENGTH) * 5.0 / 1024;
    ph_value = 3.5 * voltage + OFFSET;
    sampling_time = millis();
  }

  if (millis() - print_time > PRINT_INTERVAL) {
    Serial.print("Voltage:");
    Serial.print(voltage, 2);
    Serial.print("    pH value: ");
    Serial.println(ph_value, 2);
    digitalWrite(LED, digitalRead(LED) ^ 1);
    print_time = millis();
  }
}

double avergearray(int* arr, int number) {
  int i;
  int max, min;
  double avg;
  long amount = 0;

  if (number <= 0) {
    Serial.println("Error number for the array to avraging!
");
    return 0;
  }
  if (number < 5) { // Less than 5 samples
    for (i = 0; i < number; i++) {
      amount += arr[i];
    }
    avg = amount / number;
    return avg;
  } else {
    if (arr[0] < arr[1]) {
      min = arr[0];
      max = arr[1];
    } else {
      min = arr[1];
      max = arr[0];
    }
    for (i = 2; i < number; i++) {
      if (arr[i] < min) {
        amount += min; // arr[i] is a small value, add it to the sum
        min = arr[i];
      } else {
        if (arr[i] > max) {
          amount += max; // arr[i] is a large value, add it to the sum
          max = arr[i];
        } else {
          amount += arr[i]; // Add middle value
        }
      }
    }
    avg = (double)amount / (number - 2);
  }
  return avg;
}
This code uses a simple averaging function to smooth out the readings from the sensor, which is a great practice for getting stable results. The OFFSET constant is where you will input your calibration value after testing the sensor with standard buffer solutions.
Conclusion
Embarking on Arduino based projects like this one opens up a world of possibilities. You've now seen how straightforward it can be to set up a DFRobot pH Sensor to monitor water quality.
From understanding the core working principle to wiring the circuit and uploading the code, you are now equipped with the fundamental knowledge to integrate this powerful sensor into your own creations.
Whether your goal is to build an automated hydroponics system, monitor the health of your aquarium, or contribute to a local environmental monitoring project, the skills you've developed here are a valuable starting point.
The journey of a maker is one of continuous learning and experimentation. I encourage you to take what you've learned today and expand upon it. Try logging the data over time, or perhaps add an LCD screen to display the pH values in real-time.


