How to Assemble and Program the ACEBOTT Quadruped Spider Robot
Summary
Have you ever watched a spider gracefully navigate across different surfaces and wondered how you could recreate that fascinating movement in a robot? Building your own walking robot might seem like a complex engineering challenge, but with the right spider robot kit, it becomes an exciting and achievable project for beginners and enthusiasts alike.
The world of robotics has become increasingly accessible, especially with educational kits designed to teach fundamental concepts through hands-on learning. In this detailed tutorial, we'll explore the ACEBOTT ESP8266 Quadruped Bionic Spider Robot, covering its assembly process, programming basics, and wireless control setup. By the end of this guide, you'll have a fully functional walking robot that responds to your commands through a smartphone app.

What is the ACEBOTT Quadruped Spider Robot Kit?
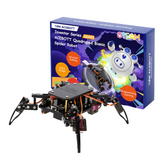
The ACEBOTT ESP8266 Quadruped Bionic Spider Robot represents an excellent entry point into the world of multi-legged robotics. This spider robot diy kit is specifically designed for young kids, making it perfect for educational environments and home learning projects.
At its core, this 4-legged spider robot uses biomimetic design principles to replicate the natural walking patterns of real spiders. The kit combines mechanical engineering with electronics and programming, creating a comprehensive learning experience that covers multiple STEM disciplines in one engaging project.
The robot operates on an ESP8266 microcontroller platform, which provides both processing power and built-in Wi-Fi capabilities. This allows for wireless control and programming flexibility that makes the learning process more interactive and enjoyable. The kit comes with detailed tutorials and step-by-step instructions, ensuring that even beginners can complete their first spider robot project.
Key Features of the ACEBOTT ESP8266 Spider Robot

Movement Capabilities
The Arduino spider quadruped robot offers impressive mobility with six different movement modes and nine preset actions. These include basic locomotion like walking forward, backward, and turning, as well as more complex behaviors such as dancing, greeting, push-ups, and even a "handsome" pose. This variety of movements demonstrates the sophisticated servo control that makes quadruped robotics so fascinating.
Hardware Components
The kit includes eight MG90 metal gear servo motors that serve as the robot's "muscles". These servos are specifically chosen for their durability and precision, ensuring stable movement and long-lasting performance. The acrylic frame construction provides a lightweight yet sturdy platform that can withstand the mechanical stresses of walking and various actions.
Power and Charging
One of the most practical features is the Type-C charging system that works with a standard 18650 lithium-ion battery. This eliminates the need for frequent battery changes and provides extended playtime for uninterrupted learning sessions. The charging circuit is integrated into the robot's PCB, making power management simple and safe.
Programming Options
The Arduino spider robot kit supports multiple programming environments, including Arduino IDE and ACECode (a Scratch-based visual programming language). This dual approach allows beginners to start with visual programming before advancing to text-based coding, creating a natural learning progression.
Assembly Guide of the ACEBOTT Spider Robot
Preparation and Initial Setup
Before beginning assembly, remove all protective paper from the acrylic components and organize your parts according to the included manual. The kit uses unified screws throughout the build process, which simplifies assembly and reduces the chance of using incorrect fasteners.

Main Body Construction
- Start by securing the servo expansion board to the main body acrylic piece using the provided M3×25mm copper pillars and M3×10mm screws.
- Next, install the four body servos onto the main frame, ensuring that each servo axis is positioned closer to the outer edge of the body as shown in the assembly diagrams.
- The ESP8266 controller board mounts on top of the expansion board, with its USB port aligned with the toggle switch on the expansion board. This alignment is crucial for proper operation and easy access during programming.

Leg Assembly Process
Each leg consists of two main sections: the coxa (hip joint) and the femur-tibia assembly (thigh and shin).
- Attach the single-axis servo horns to the coxa structures.
- After that, join the coxa and femur parts to create the main leg joints.
- Pay careful attention to the left and right orientations, as each side requires specific positioning.
- The remaining four servos are installed into the tibia structures, which form the lower leg segments.
Again, maintain proper left and right orientation during this step to ensure correct walking mechanics.

Wiring and Final Assembly
The wiring process requires careful attention to servo connections.
- Connect the four body servo wires to pins D1, D2, D6, and D7, while the four leg servo wires connect to pins D0, D4, D5, and D8.
- Remember that brown wires represent ground (GND), red wires are power (VCC), and orange wires carry the control signals.

Programming the ACEBOTT Spider Robot
The ACEBOTT ESP8266 Quadruped Bionic Spider Robot kit can be programmed in 2 ways: using Arduino IDE for text-based programming and ACECode for visual block-based programming. Both methods offer unique advantages and cater to different skill levels, making this spider robot kit accessible to beginners while providing advanced capabilities for experienced programmers.

Method 1: Arduino IDE Programming
Arduino IDE provides a traditional text-based programming environment that offers complete control over your Arduino spider robot. This method is ideal for users who want to learn conventional programming concepts and implement custom functionalities.
Step-by-Step Instructions for Arduino IDE:
Step 1: Software Installation
- Download and install the latest version of Arduino IDE from the official Arduino website
- Launch Arduino IDE and navigate to File > Preferences
- Add the ESP8266 board package URL to the "Additional Board Manager URLs" field
- Go to Tools > Board > Board Manager and search for "ESP8266"
- Install the ESP8266 board package
Step 2: Board Configuration
- Connect your robot to your computer using a USB cable
- Select Tools > Board > ESP8266 Boards > NodeMCU 1.0 (ESP-12E Module)
- Choose the correct COM port under Tools > Port
- Set the upload speed to 115200 baud for optimal performance
Step 3: Library Installation
- Install the required servo library by going to Sketch > Include Library > Manage Libraries
- Search for "Servo" and install the ESP32Servo library
- Download the ACEBOTT example code from their GitHub repository
- Extract the files to your Arduino sketches folder
Step 4: Code Upload and Testing
- Open one of the example sketches (start with basic movement examples)
- Verify the code by clicking the checkmark icon
- Upload the code to your robot using the arrow icon
- Open the Serial Monitor to view debugging information
- Test basic movements to ensure proper servo connections
Method 2: ACECode Visual Programming
ACECode is a beginner-friendly, visual programming environment similar to Scratch. This method is perfect for younger users and those new to programming, which allows them to create complex behaviours without writing traditional code.
Step-by-Step Instructions for ACECode:
Step 1: Software Setup
- Download ACECode from the official ACEBOTT website
- Install the software following the provided installation guide

- Launch ACECode by clicking the ACECode icon and familiarize yourself with the block-based interface

- Connect your spider robot diy kit to your computer via USB
Step 2: Device Connection
- Click on the "Connect" button in ACECode
- Select your robot's COM port from the dropdown menu
- Wait for the connection confirmation message
- Test the connection by uploading a simple program
Step 3: Understanding the Interface
- Explore the different block categories: Motion, Control, Sensors, and Variables
- Practice dragging and dropping blocks to create simple sequences
- Use the "Events" blocks to set up program triggers
- Familiarize yourself with the servo control blocks specific to your 4-legged spider robot
Step 4: Creating the First Program
- First of all, you have to add the “4 legged bionic Spider” extension.
- For that, click on the Blue Icon on the bottom left corner, as indicated by the red arrow in the image below.

- The following screen will appear. From there, select the extension named “Quadruped Bionic Spider Robot”, as highlighted by the red arrow in the image below.

- Now you will notice an additional option for the left side of the screen, which is highlighted by the red arrow in the image below.

- Now, you create a simple program to move the robot forward.
- From the “Events” option in the left side of the screen, select “start the program” and “forever” block.
- Then, “from the Quadruped Bionic Spider Robot”, select the “Move” option.
- Put all the blocks like the one mentioned in the image below.

- Upload this program and test in your robot.
Wi-Fi and Remote Control Setup
Once your spider robot kit is assembled and programmed, setting up wireless control is straightforward. The Spider robot can be controlled remotely through your smartphone, making it easy to operate your walking robot from anywhere in the room.
Network Configuration
The ESP8266 microcontroller creates its own Wi-Fi access point, so you don't need an existing internet connection. After uploading the control program to your robot, it will automatically broadcast a Wi-Fi network that appears in your phone's available connections list. Simply connect to this network like you would any other Wi-Fi hotspot.
Mobile App Setup
Download the ACEBOTT mobile application from your device's app store. The app is free and provides an intuitive interface for controlling all robot movements and actions remotely. Once installed, connect to your robot's Wi-Fi network and launch the app to start controlling your spider robot project.
Control Interface
The mobile app displays clear directional controls for forward, backward, left, and right movement. Additionally, you'll find buttons for nine preset actions that showcase your 4 legged spider robot's capabilities such as:
- Standby, lying, and sleep positions
- Interactive poses like greet and handsome
- Action movements including push-up, fighting, dancing, and swing
The wireless range works well for typical room environments, which gives you comfortable control distance for indoor use.
Troubleshooting Connection Issues
If you experience connectivity problems, check that your robot's battery is fully charged and that you're connecting to the correct network name. The robot must be powered on and running the control program for the Wi-Fi access point to appear. If there are still some issues, then try restarting both the robot and the app, then reconnect to the network.
Conclusion
Building and programming the ACEBOTT Quadruped Spider Robot offers an excellent introduction to multi-disciplinary STEM learning. This spider robot kit successfully combines mechanical assembly, electronics understanding, and programming skills into one engaging project that provides lasting educational value.
The step-by-step assembly process teaches fundamental engineering principles while developing problem-solving skills and attention to detail. Programming the robot introduces computational thinking concepts and provides immediate visual feedback that makes learning more effective and enjoyable.


