Programming the ACEBOTT Bionic Robot: A Step-by-Step Tutorial
Summary
Watching a robot walk on two legs like a human has always captured our imagination, and now this fascinating technology is within reach of students and hobbyists. The world of bionic robotics has evolved dramatically, making it possible for anyone to build and program their walking robot at home. Whether you're a parent looking for an engaging STEM education robot for your child or a maker eager to explore the possibilities of Arduino-based robot programming, the journey into humanoid robotics has never been more accessible.
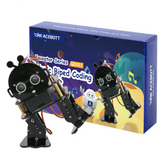
The ACEBOTT QD021 bionic robot is a perfect entry point into this exciting field, offering a comprehensive learning experience that combines mechanical assembly with intuitive programming. This beginner guide to ACEBOTT robot will walk you through every step of the process, from unpacking your kit to programming your first walking sequences. By the end of this tutorial, you'll have a fully functional bipedal robot that responds to your commands and demonstrates the principles of balance, movement, and coordination that make human-like locomotion possible.

What is the ACEBOTT Bionic Biped Robot Kit
The ACEBOTT QD021 Bionic Robot kit provides a perfect blend of education and entertainment, designed specifically for makers aged 12 and above. This robotics kit for kids and adults alike focuses on mimicking human walking patterns using a sophisticated four-servo system that controls the robot's thigh and calf joints.
At its core, this STEM education robot uses an ESP32 microcontroller as its brain, providing WiFi connectivity and powerful processing capabilities. The robot's aluminum alloy construction ensures durability while maintaining the lightweight design necessary for stable bipedal movement. It can be programmed using block-based programming through ACECode, which makes Arduino-based robot programming accessible to beginners without requiring extensive coding knowledge.
The kit serves as an excellent introduction to bionic robotics concepts, teaching users about servo control, movement coordination, and basic artificial intelligence through hands-on experience.
Features of the Biped Robot Kit
The ACEBOTT Bionic Robot kit comes packed with features that make it an ideal learning platform for both beginners and experienced makers. The kit's design philosophy centers around providing maximum educational value while maintaining ease of use.
Key Features:
- 12 Preset Actions: Includes kick, tilt, follow, stamp, and obstacle avoidance capabilities that can move in four directions
- ESP32 Platform: Powerful dual-core processor with built-in WiFi and Bluetooth connectivity for wireless control
- Aluminum Alloy Construction: Durable yet lightweight frame designed for stable bipedal movement
- Multiple Control Options: Web interface, mobile app, and direct programming control through ACECode
- Block-Based Programming: User-friendly ACECode software eliminates the need for complex coding syntax
- Customizable Actions: Advanced users can create and program their own unique movements and behaviors
- Battery Level Indicators: Built-in LED system displays current battery status and charging state
Steps to Assemble the Product
Building your Bionic Robot is a straightforward process, thanks to the comprehensive tutorial and visual assembly guide provided by ACEBOTT. The assembly process teaches valuable mechanical engineering concepts while building excitement for the programming phase.
- Prepare Your Workspace: Gather all components from the kit and ensure you have adequate lighting and space for assembly
- Frame Construction: Begin by assembling the main aluminum frame, connecting the upper and lower body sections according to the provided diagrams
- Servo Installation: Install the four servo motors in their designated positions - left and right thigh servos (GPIO5 and GPIO18) and left and right calf servos (GPIO16 and GPIO17)
- ESP32 Controller Setup: Mount the ESP32 controller board and connect it to the servo expansion board, ensuring proper cable management
- Power System Integration: Install the battery compartment and connect the power distribution system, paying attention to the polarity indicators
- Final Assembly: Attach the feet assemblies and perform a visual inspection to ensure all connections are secure
- Initial Testing: Power on the system and verify that all servos respond correctly to basic commands before proceeding to programming
The entire assembly process typically takes 2-3 hours. Doing this assembly process on your own serves as an excellent introduction to mechanical engineering principles.
Steps to Program Using ACECode
Programming your Bionic Robot through ACECode transforms complex robotics concepts into an intuitive drag-and-drop experience. This ACEBOTT Bionic Robot tutorial section focuses exclusively on block programming, making it accessible to users of all skill levels.
Programming Setup:
- Download ACECode: Visit the official ACEBOTT website and download the ACECode software compatible with your operating system
- Install Extensions: Launch ACECode and add the "Biped Robot" extension from the extension library to access robot-specific programming blocks
- Click the extension icon on the bottom left corner, as indicated by the red arrow in the image below.

- Next, select the “Biped Robot” extension as shown in the image below.

- Now, you will see a new icon on the left-hand side of the screen, for Biped Robot.

- Connect Hardware: Use the provided USB cable to connect your ESP32 controller to your computer, then select the correct board and port in ACECode
Creating a basic program:
- You can now start programming your robot to move.
- We’ll provide a simple code to help you get started. This code, provided in the image below, will make the Robot move forward.

- Upload this program and see your robot move. The movement should be similar to the image below.
- The block-based approach in these bionic robot programming steps eliminates syntax errors while teaching fundamental programming concepts like loops, conditionals, and functions
Conclusion
The ACEBOTT Bionic Robot provides a gateway into the fascinating world of bionic robotics and STEM education. Through this hands-on experience, you'll gain valuable insights into mechanical engineering, programming, and problem-solving while creating something truly remarkable.
What makes this robotics kit for kids special is its ability to transform complex engineering concepts into achievable milestones. From your first successful assembly to watching your robot navigate obstacles autonomously, each step builds confidence and knowledge that extends far beyond robotics.
The skills you develop through this ACEBOTT Bionic Robot tutorial - logical thinking, systematic problem-solving, and creative engineering - are valuable in countless fields. Whether you're exploring career options in robotics, engineering, or computer science, or simply enjoying the satisfaction of building something amazing, this kit provides a solid foundation for future learning and exploration.


