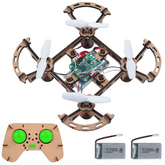
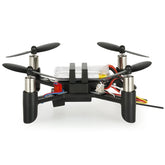
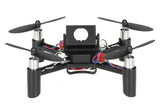
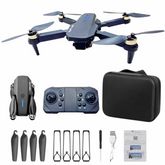
GKFESCC RC DIY Wooden Drone Kit Assembly Guide
Summary
There’s a unique satisfaction that comes from building something with your own hands, and that feeling is magnified when the creation can take to the skies.
For beginners, the world of drones can seem complex and intimidating. The GKFESCC RC DIY Wooden Drone Kit is designed to change that.
This kit serves as a perfect entry point, demystifying the technology behind quadcopters and transforming the learning process into a thrilling, hands-on adventure.
It’s more than just a toy; it’s an educational experience wrapped in the fun of flight, making it an ideal project for kids and beginners alike.
This guide will walk you through every step, from unboxing the components to preparing for your very first flight.

What's Inside the Box?
When you open your GKFESCC drone kit, you will find all the necessary components, neatly organized and ready for assembly.
The kit is designed to be a comprehensive package, ensuring you have everything you need to build both the drone and its controller.
Here’s a look at the components included:

- Wooden Frame Sheets: Laser-cut wooden boards containing the pop-out pieces for the drone’s body and the remote controller's casing.
- Flight Controller (FC): This Drone controller is the brain of your drone. It’s a small circuit board that processes inputs from the remote and controls the motors to keep the drone stable in the air.
- Remote Control Circuit Board: The electronic component for the transmitter, which you will also assemble.
- Coreless Motors: Four small, pencil-like motors that will power the propellers. These are lightweight and efficient, perfect for a mini drone.
- Propellers: You'll receive a full set of propellers, typically with a few spares in case of damage. Note that there are two types: clockwise and counterclockwise.
- Rechargeable Batteries: The kit includes two small Lithium-Ion batteries—one to power the drone and another for the remote controller.
- USB Charging Cable: A convenient USB cable for recharging both batteries from any standard USB port.
- Instruction Manual: A guide with diagrams to help visualize the assembly process
Tools that You'll Need for the Build
While the kit is comprehensive, you will need a few basic tools to ensure a smooth and successful assembly.
Having these on hand before you start will make the process more enjoyable and prevent interruptions.
- Clean, Well-Lit Workspace: A flat table or desk with good lighting is essential. This will help you keep track of small components and see the details of your work.
- Small Screwdriver: A small Phillips-head screwdriver may be needed for securing certain components.
- Hobby Knife or Sandpaper (Optional): The wooden parts are laser-cut and should fit well, but a hobby knife or a small piece of fine-grit sandpaper can be useful for removing any small burrs and ensuring a perfect fit.
- Wood Glue or Super Glue (Optional): While the parts are designed to slot together, adding a small dab of glue to the joints can add extra durability to the frame, especially if it's going to see a lot of flight time
Step-by-Step Assembly Guide
This is where the real fun begins. The assembly is best done in two main stages: building the remote control first, followed by the drone itself.
The remote is a simpler build and will familiarize you with how the wooden pieces fit together.
Part 1: Assembling the Remote Control

The remote control is your connection to the drone, so building it carefully is important.
- Prepare the Pieces: Gently punch out all the wooden parts for the remote from the main board. Lay them out on your workspace to identify each piece.
- Mount the Electronics: Take the remote-control circuit board and place it onto the corresponding wooden base piece. Align the holes for the joysticks and buttons.
- Install Joysticks and Buttons: Carefully place the plastic joystick caps and buttons into their slots on the circuit board, pushing them through the top piece of the remote's casing. Wiggle them gently to ensure they move freely and don’t stick. A stuck button could cause issues during flight.
- Assemble the Casing: Fit the side and top pieces of the wooden casing around the circuit board. The parts should interlock snugly.
- Power It Up: Connect the remote’s battery to the circuit board and tuck it inside the casing before closing it up. It's a good idea to put the batteries on charge before you start building, so they are ready to go.
Part 2: Constructing the Drone Frame

With the remote complete, it's time to build the star of the show. The frame of this DIY wooden drone kit is what gives it a unique charm.
- Punch Out Frame Parts: Just as with the remote, carefully pop out the drone’s frame pieces from the wooden sheet. You should have a top plate, a bottom plate, and four arms.
- Form the Chassis: Interlock the pieces to form the main "X" shaped quadcopter frame. The design is intuitive, but double-check with your manual’s diagrams to ensure everything is oriented correctly. This stage is a great example of the hands-on engineering involved in a DIY wooden drone kit.
Part 3: Mounting the Motors and Flight Controller

This is the most technical part of the build. Pay close attention to orientation and connections.
- Install the Motors: Insert each of the four motors into the mounts at the end of each arm. Ensure they are seated securely.
- Mount the Flight Controller: Secure the flight controller board at the center of the frame. Crucially, the board must be facing the right way. Your manual will indicate a "forward" direction, often marked by an arrow on the board or the position of the antenna. Installing it backward will cause the drone to be uncontrollable.
- Connect Motor Wires: This step is critical for successful flight. Each motor has two wires (often red/blue and black/white) that must be plugged into the correct port on the flight controller. The manual will show which motor connects where. Connecting them incorrectly will cause the drone to flip over immediately upon takeoff. This precision is a core lesson from building a DIY wooden drone kit.
Part 4: Attaching the Propellers and Final Checks

Ensure these final touches to prepare your drone for its first voyage.
- Install the Propellers: You will have two types of propellers: clockwise (CW) and counter-clockwise (CCW). They are not interchangeable. Your manual will show a diagram indicating which type of propeller goes on which motor. Pushing the wrong propeller onto a motor is a common mistake that prevents a drone from flying. This is the final assembly step for your DIY wooden drone kit.
- Install the Battery: Connect the fully charged drone battery to the flight controller and secure it to the underside of the frame.
- Binding: Turn on the remote and then the drone. The process of linking them is called "binding." Typically, you'll need to move the left joystick up and then down to establish a connection.
Conclusion
Congratulations! You have successfully assembled your very own flying machine from a DIY wooden drone kit.
You’ve pieced together wood and electronics to create something functional and fun. Before you take to the skies, take a moment to appreciate what you’ve built.
Your new drone is equipped with user-friendly features like Altitude Hold, which helps it maintain a steady height, and Headless Mode, which makes it easier to control regardless of which way it's pointing.
For your first flight, choose a spacious indoor area away from obstacles. Start with basic maneuvers: takeoff, hover, and land.
As you grow more confident, you can practice flying forward, backward, and turning.


