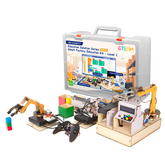
ACEBOTT QE031 Smart Factory STEM Education Kit Assembly Guide
Summary
Automation has become the engine of modern industry, from vast warehouses to precision manufacturing.
To prepare future innovators for this Industry 4.0 reality, students need more than textbooks; they need hands-on experiences that connect theory to practice. A miniature smart factory can demystify complex concepts like robotics and logistics.
This guide explores the assembly process of the ACEBOTT QE031, a kit that brings a modern automated warehouse into the classroom, detailing everything from unboxing to its powerful applications in STEM education.

Unboxing the ACEBOTT QE031 Kit
Opening the ACEBOTT QE031 Smart Factory Kit contains the following components:
- Structural Parts: The main chassis, a multi-level storage rack, and the conveyor frame.
- Mechanical Components: A DC motor, a set of high-precision servo motors for the robotic arm, and the conveyor belt.
- Electronics: The main controller board, an LCD screen, an RFID reader, an IR sensor, and a button module.
- Hardware: All necessary screws, wires, and electronic tags to connect everything.
Tools and Preparation Before Assembly

A smooth assembly experience begins with proper preparation. Before touching the first screw, set up a clean, well-lit workspace to keep all parts organized.
Briefly reviewing the ACEBOTT QE031 assembly guide provides a mental map of the process, making the build more intuitive and educational.
- Workspace: A clean, spacious area is ideal. An anti-static mat is recommended to protect electronics.
- Essential Tools: A set of small Phillips head screwdrivers and tweezers for handling tiny parts.
- Organization: A magnetic tray or small container to keep screws and nuts from getting lost.
Step-by-Step ACEBOTT Smart Factory Kit Assembly Guide
This comprehensive guide provides detailed instructions for constructing the mechanical frame and wiring the electronic components of your automated warehouse system.
1. Install Controller Board

Begin by installing the main controller board, which acts as the brain of your smart warehouse. Carefully align the mounting holes on the board with the corresponding standoffs on the primary chassis.
Use the provided screws to securely fasten the board in place. Ensure it is firmly seated and does not wobble, as this component will connect to all other electronic modules.
2. Install Battery Holder

Next, mount the battery holder onto its designated spot on the base of the unit. The battery holder provides power to the entire system, so a secure connection is crucial.
Align it correctly and fasten it using the appropriate screws. Make sure its orientation allows for easy insertion and removal of batteries once the assembly is complete.
3. Install Base Guard

Attach the protective base guard to the main chassis. This component shields the delicate electronic components, like the controller board and motor driver, from accidental bumps or debris.
It also contributes to the overall structural rigidity of the frame. Align the guard with its mounting points and secure it firmly.
4. Install Motor Drive Module

Fix the motor drive module onto the base plate. This module is responsible for receiving signals from the controller board and translating them into the power needed to operate the conveyor belt motor.
Position it near both the motor and the controller board to simplify the wiring process later.
5. Fix Conveyor Belt

Carefully place the pre-assembled conveyor belt unit onto the main frame. Align it so that it integrates seamlessly with the rest of the structure, ensuring there is a clear path for items to travel from one end to the other. Secure it tightly so it remains stable during operation.
6. Fix Robotic Arm

Mount the robotic arm assembly onto its primary pivot point on the chassis. This arm is the centerpiece of the sorting system.
Pay close attention to its orientation during installation to ensure it has the correct range and direction of motion to pick up items from the conveyor and place them in the storage rack.
7. Install LCD1602 Display

Attach the LCD1602 screen to its front-facing mounting bracket. This screen will serve as the visual interface, providing real-time status updates, readouts from the RFID scanner, and other operational data. Ensure it is positioned for clear visibility during use.
8. Install 4-Digit Button Module

Mount the 4-digit button module into its designated slot, typically located near the LCD screen for convenient user access.
This module will function as the primary control panel, allowing you to start, stop, and interact with the warehousing system's functions.
9. Assemble Storage Rack

Construct the storage rack where the robotic arm will place sorted items. This involves connecting the individual shelf pieces with the vertical supports to create a stable, multi-level unit.
Ensure all parts are interlocked correctly and that the finished rack is level and does not lean.
10. Fix the Storage Rack

Attach the fully assembled storage rack to the main warehouse structure. It should be positioned at the end of the line, within easy reach of the robotic arm. This integration is critical for the seamless transfer of items from the conveyor belt into their designated storage slots.
11. Install RFID Module

Mount the RFID (Radio-Frequency Identification) module onto its designated position on the frame. This sensor is responsible for identifying the electronic tags on items as they move along the conveyor belt.
Proper placement is essential for ensuring reliable and accurate scans, so position it where it has a clear line of sight to the items.
12. Fix Modules

Secure any remaining peripheral modules, such as the IR (infrared) sensor, to their respective mounting points. The IR sensor is often used to detect the presence of an item at a specific point on the conveyor.
Once all modules are in place, take a moment to review the entire assembly and ensure every component is fastened securely.
13. Install LUNA

Proceed to install the LUNA module. This specialized component integrates with the controller to provide specific functionalities. Carefully attach it to its designated mounting location on the main assembly, using the provided hardware to ensure it is held firmly in place.
14. Attach Electronic Tags

Affix the small RFID electronic tags to the blocks or items that your smart warehouse will be handling. Each tag has a unique identifier that the RFID module will read.
Ensure the tags are attached securely so they do not fall off as the items are moved by the conveyor and robotic arm.
15. Wiring

This crucial step involves connecting all the electronic modules to the main controller board. Route your wires neatly and connect each component to its specified pin to ensure proper functionality.
a. Motor Drive Module: Connect the control lines for the conveyor belt motor to Pin 16 and Pin 17.
b. Robotic Arm Servos: Connect the four servo motor cables in sequence, starting from the base of the arm and moving to the gripper.
- Bottom Servo (base rotation): Pin 5
- Second Servo (lower arm joint): Pin 12
- Third Servo (upper arm joint): Pin 18
- Top Servo (gripper): Pin 19
c. RFID Module: Connect its cable to one of the I2C pins on the controller board.
d. LCD 1602 Display: Connect its cable to another available I2C pin.
e. IR Module: Connect its signal line to Pin 32.
f. Four-Digit Button Module: Connect its signal line to Pin 36.
16. Complete Assembly

With all mechanical and electronic components installed and wired, perform a final inspection. Check that all screws are tight, wires are organized and not obstructing any moving parts, and that the conveyor belt and robotic arm can move freely through their full range of motion. Your smart warehouse is now fully assembled and ready for power-up and programming.
Applications of the ACEBOTT QE031 in STEM Classrooms
Once assembled, the ACEBOTT QE031 becomes a dynamic platform for education, transforming abstract STEM concepts into tangible experiences.
As a comprehensive STEM education kit, it offers a multidisciplinary approach to learning that is both engaging and effective, making complex theories accessible.
- Programming & Logic: Students can write code to control the entire workflow, learning concepts like conditional statements and functions with immediate, physical feedback.
- Robotics & Engineering: The kit provides a hands-on lesson in how servo and DC motors work together to create a functional automated system. This makes it an excellent STEM kit for students.
- Mechatronics: It introduces the integration of mechanical and electronic systems, a core principle of modern engineering and a key part of hands-on STEM learning.
Upgrade Your STEM Classroom with the ACEBOTT Kit
Integrating the ACEBOTT QE031 Smart Factory Kit can transform a traditional classroom into an interactive innovation lab. This advanced STEM robotics kit for schools moves beyond theory, empowering students to become active creators and problem-solvers.
- Fosters Critical Skills: Encourages collaboration, project management, and resilience as students work together to build and troubleshoot the system.
- Enhances Engagement: The hands-on nature of the kit makes STEM learning more engaging and memorable, connecting concepts to real-world applications.
Get Your ACEBOTT Kit Delivered to Your Doorstep
If you are ready and want to bring this innovative learning tool to your classroom, then Robocraze simplifies the process.
As a leading supplier of robotics and STEM components in India, Robocraze ensures you receive your ACEBOTT QE031 Smart Factory Kit quickly and reliably, helping you start your journey into automation with confidence.
Conclusion
The ACEBOTT QE031 is a great educational STEM kit to help students understand the technologies that will define our future.
It makes complex concepts like automation and logistics tangible and interactive, placing it at the forefront of modern STEM education.
For students, hobbyists, or educators, it offers a powerful platform to turn digital logic into physical reality.


