


People Also Buy

12V 8-Channel Relay board
27 reviews
Regular price
Rs. 347
Regular price
Rs. 449
Sale price
Rs. 347
Unit price
per
Incl. GST (No Hidden Charges)
Sale

4 Channel 12V Relay Board
27 reviews
Regular price
Rs. 152
Regular price
Rs. 236
Sale price
Rs. 152
Unit price
per
Incl. GST (No Hidden Charges)
Sale

16 Channel 12V Relay Module Board
27 reviews
Regular price
Rs. 516
Regular price
Rs. 720
Sale price
Rs. 516
Unit price
per
Incl. GST (No Hidden Charges)
Sale
Found a better price?
Let us know!
We'll try to match the price for you
Package Includes:
- 1 x 
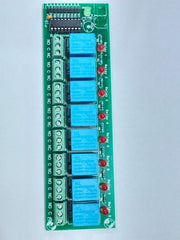
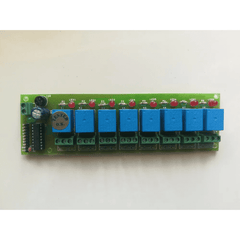
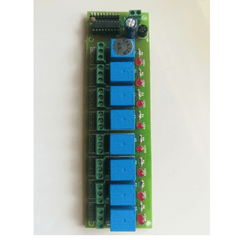
8-CH 12V ULN2003 Based Relay Board
Specifications:
Number of Channels | 8 |
Operating Voltage | 1V |
Board Type | ULN2003 Based Relay Board |
Dimensions | 160 x 50 x 18mm |
Weight | 15 grams |
1. What are the applications of 8 channel relay module?
- The 8-channel relay is isolated, safe, reliable, and anti-interference. 8 channel relay is widely used for all MCU control, industrial field, PLC control and smart home control. It can be directly connected to and controlled by microcontrollers such as Arduino, 8051, AVR, PIC, DSP, ARM, ARM, MSP430, TTL logic.
2. How does a 8 channel relay work?
- The 8-channel relay module includes eight 5V relays and associated switching and isolation components, making it easy to connect to a microcontroller or sensor with a minimum of components and connectors. Each relay on the board has the same circuitry and the input ground is common to all eight channels. The electromagnet is activated by another low power signal from the microcontroller. When activated, the electromagnet is attracted to open and close the circuit.
3. How to connect an relay to Arduino?
- It's very easy to connect the 4 relay modules to the Arduino and you can control many devices through the Arduino including AC and DC. In this example, we will connect a simple load like an LED to the output of the relay and drive it with the Arduino. First, connect the Arduino's 5V to the 4-relay module's VCC, and the Arduino's ground to the 4-relay module's ground. Next, we need to connect the communication pins IN1, IN2, IN3 and IN4 to the Arduino data pins 7, 6, 5 and 4. A 3V battery is used to light the LED. So I connected the positive side of the battery to the positive side of the LED, the negative side to the COM of each relay, and the NO to the negative side of the LED.