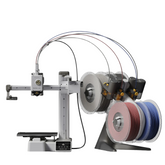
How to Use the Goofoo Cube Mini 3D Printer?
Summary
The world of 3D printing has evolved from complex industrial machinery to accessible desktop devices that bring manufacturing capabilities directly to our homes, classrooms, and makerspaces.
What once required extensive technical expertise and significant financial investment now fits comfortably on any desk, ready to transform digital concepts into tangible reality.
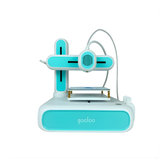
The Goofoo Cube Mini 3D Printer represents this evolution perfectly: a compact, educational-focused platform that doesn't compromise on print quality while remaining refreshingly approachable for beginners and experienced makers alike.
In this comprehensive guide, we'll explore everything you need to know about setting up and using the Goofoo Cube Mini 3D Printer, helping you navigate from unboxing to your first successful print with confidence and ease.

Unboxing and Setting Up the Goofoo Cube Mini
Let's start with that exciting moment we all love, that is, unboxing your new 3D printer! I remember the anticipation I felt when my Goofoo Cube Mini 3D Printer arrived, and honestly, the experience exceeded my expectations right from the moment I opened the box.
Unlike those intimidating packages filled with countless screws and confusing parts, this printer takes a refreshingly different approach that'll have you smiling instead of scratching your head.

The package arrives as a thoughtfully organized kit that immediately impresses with its educational focus and user-friendly design approach. Opening the box reveals a well-organized collection of components that speaks to the manufacturer's commitment to making 3D printing accessible to students, educators, and hobbyists.
Step-by-Step Assembly Instructions
Initial Unboxing and Component Check
- Begin by carefully unboxing all the components from the package and laying them out on a clean, flat surface
- Identify the main printer frame, Z-axis assembly, X-axis component, extruder unit, and all connecting cables before starting assembly.
- Ensure you have all the necessary electronic components including the power supply, USB cable, and sample filament materials.
Installing the Z-Axis Assembly
- Take the Z-axis component and position it vertically on the main printer frame
- Prss the Z-axis downwards firmly with one hand while using your other hand to tighten the connection mechanism.
- Ensure the threaded portion is completely hidden and not visible once properly tightened—this is crucial for preventing unwanted printing results
- Double-check that the Z-axis is securely fastened and doesn't wobble when gently tested.
Mounting the X-Axis Component
- Hold the X-axis assembly at approximately a 60-degree angle using one hand for support
- Carefully buckle or connect the X-axis to the Z-axis assembly as demonstrated in the assembly guide.
- Verify that the connection is properly secured and not loose by gently testing the movement.
- Locate port number 3 on the printer's control board and connect the X-axis cable firmly
Installing the Extruder Unit
- Support the extruder unit at a 60-degree angle with one hand while positioning it for installation
- Buckle or connect the extruder unit to the X-axis assembly, ensuring it sits perpendicular to the X-axis for proper alignment.
- Confirm the extruder is securely fastened and maintains proper positioning during movement.
- Connect the extruder cable to port number 4 on the control board, ensuring a solid connection
Final Assembly Steps
- Attach the filament tube to the extruder unit, making sure it's firmly connected and won't disconnect during operation
- Verify all cable connections are secure and properly seated in their designated ports.
- Test the mechanical movement of all axes to ensure smooth operation without binding or resistance.
- Complete the easy-to-assemble 3D printer setup by installing the magnetic build plate onto the printer bed.
How to Power Up and Connect the Printer

Powering up your newly assembled Goofoo Cube Mini 3D Printer marks the transition from static hardware to functional manufacturing tool.
The power management system demonstrates thoughtful engineering with safety features and user-friendly operation that prioritizes both performance and protection.
The external power adapter provides stable voltage regulation essential for consistent print quality.
Connect the power cable to the designated port on the printer's control board, ensuring a secure connection that won't accidentally disconnect during printing. The power indicator LED confirms proper electrical connection and system readiness.
Initial power-up triggers an automatic system check sequence that verifies all mechanical components, sensors, and heating elements function correctly.
This self-diagnostic process typically completes within 30-45 seconds, providing immediate feedback about any potential issues requiring attention.
Connectivity options include both USB tethering for direct computer connection and wireless Wi-Fi 3D printing capabilities that enable remote print management.
The Wi-Fi setup process requires accessing the printer's built-in configuration interface through a web browser, where you'll enter your network credentials and establish the wireless connection.
USB connectivity provides reliable, direct communication between your computer and printer, ideal for beginners who prefer straightforward cable connections.
The included USB cable supports both file transfer and real-time print monitoring, ensuring consistent communication throughout extended print jobs.
Installing and Using the Goofoo CUBE App

With your printer powered up and connected, let's dive into the digital side of things, and trust me, this is where the Goofoo Cube Mini 3D Printer really starts to shine! Gone are the days when 3D printing meant wrestling with complicated desktop software that required a computer science degree to understand.
The Goofoo CUBE app brings everything right to your smartphone, making print management as easy as scrolling through your social media feed.
Initial Setup and Connection
- Download and install the Goofoo CUBE app on your smartphone or tablet from your device's app store
- Add your printer to the app by selecting the "Add Printer" option when using the app for the first time
- Ensure both your phone and the Goofoo Cube Mini 3D Printer are connected to the same Wi-Fi network for wireless communication
- Verify that your filament is properly loaded and ready for printing before proceeding with any print operations
Preheating and Filament Loading
- Navigate to the preheating section within the app to warm up the printer's extruder and build plate
- Select the appropriate temperature settings based on the type of filament you're using (PLA typically requires lower temperatures than ABS or PETG)
- Wait for the preheating process to complete before attempting to load filament into the system
- Use the app's filament loading feature to feed material through the extruder once the proper temperature is reached
Bed Leveling Process
- Access the leveling tab within the app to begin the auto bed leveling process
- Click "Start Leveling" to initiate the automatic bed leveling sequence
- Follow the on-screen prompts and click "Next" for each calibration point as the printer measures the build platform
- Allow the system to complete all leveling points for optimal first-layer adhesion
Manual Control Functions
- Use the Manual tab to access direct control over the printer's movement axes
- Control the Z-axis (vertical movement) to move the print arm up and down as needed
- Adjust the Y-axis to move the print bed forward and backward for positioning
- Manipulate the X-axis to move the print nozzle left and right across the build area
Starting a Print Job
- Browse the app's model library and select your desired 3D model for printing
- Click "Select Model" to choose your preferred design from the available options
- Tap "Start Printing" to begin the filament printing process
- Note that your phone is not required to remain connected during the actual printing process
- Feel free to take your phone away, turn it off, or close the app once printing has begun, as the printer operates independently
Additional App Features
- Access the Video tab to find helpful instructional videos and assembly guides for the Cube 3D printer
- Visit the "Me" tab to browse your favorite 3D models, access help documentation, and adjust various app settings
- Utilize the help section for troubleshooting guidance and technical support resources
- Customize app preferences and printer settings through the settings menu available in the Me section
These step-by-step instructions ensure you can effectively utilize all the key features of the Goofoo CUBE app for successful wireless Wi-Fi 3D printing with your educational 3D printer.
How to Level the Bed for Better Prints
Alright, let's talk about something that might sound intimidating but is actually much easier than you think, bed leveling. I know, I know, the term "bed leveling" makes it sound like you need a construction worker's level and engineering precision, but here's the thing: the Goofoo Cube Mini 3D Printer has made this process so user-friendly that you'll wonder why other manufacturers haven't figured this out yet.
Proper bed leveling forms the foundation of successful 3D printing, and this printer incorporates both manual adjustment capabilities and auto bed leveling features that work together to ensure optimal first-layer adhesion.
Understanding this bed leveling guide process will dramatically improve your print success rate and overall satisfaction with the printing experience.
The magnetic build plate system simplifies bed preparation and print removal while maintaining the precise surface flatness essential for quality printing.
The magnetic base attaches securely to the printer's build platform, while the removable print surface provides excellent adhesion during printing and easy part removal when complete.
Manual bed leveling begins with preheating the print bed to operating temperature, typically around 60°C for PLA filament printing. This thermal expansion ensures the leveling process accounts for real printing conditions.
Using the provided adjustment tools, check each corner of the build platform by moving the print head to each position and adjusting the bed height until a standard piece of paper slides between the nozzle and bed with slight resistance.
The integrated auto bed leveling system uses probe sensors to measure bed surface variations and automatically compensate during printing. This intelligent system reduces the frequency of manual adjustments while ensuring consistent first-layer quality across the entire build surface.
Starting Your First Print: A Step-by-Step Guide

Here we are—the moment you've been building up to! Starting your first print is honestly one of the most exciting milestones in your 3D printing journey, and I still remember the mix of excitement and nervous anticipation I felt before hitting that "start print" button for the first time.
The Goofoo Cube Mini 3D Printer makes this process so straightforward that you'll be wondering why you were worried in the first place.
This comprehensive 3D printer setup process builds confidence through systematic preparation and careful attention to each crucial step that influences final print quality.
- Begin by selecting an appropriate model from the Goofoo CUBE app's educational library or importing your own STL file. For first-time users, choose simple geometric shapes or educational models specifically designed for beginners.
- Load your chosen filament into the printer's feeding system, ensuring the material flows smoothly through the heated extruder. PLA filament works excellently for initial prints due to its low printing temperature requirements, minimal warping tendencies, and user-friendly characteristics. Feed the filament until you observe consistent extrusion from the nozzle.
- Configure print settings through the app interface, selecting appropriate layer height, print speed, and infill density for your chosen model. Beginners should start with 0.2mm layer heights, moderate print speeds around 50mm/s, and 15-20% infill density for good strength-to-speed balance. These conservative settings prioritize print success over speed.
- Initiate the printing process and monitor the first few layers carefully. Proper first-layer adhesion appears as smooth, consistent material deposition without gaps or excessive squishing. The FDM 3D printing basics become apparent as you watch layers build systematically, each adding to the growing three-dimensional object.
Conclusion
The Goofoo Cube Mini 3D Printer successfully bridges the gap between educational accessibility and practical functionality, creating a platform that serves students, educators, and hobbyists with equal effectiveness.
Through thoughtful engineering choices like the Lego-style 3D printer assembly approach and comprehensive software ecosystem, this printer removes traditional barriers that have historically made 3D printing intimidating for newcomers.
The combination of wireless Wi-Fi 3D printing capabilities, auto bed leveling technology, and the intuitive Goofoo CUBE app creates a user experience that prioritizes learning and creativity over technical complexity.
Whether you're introducing students to manufacturing concepts or pursuing personal maker projects, this platform provides the reliability and support necessary for consistent success.
Robocraze stocks the Goofoo Cube Mini 3D Printer at competitive prices, ships nationwide, and provides comprehensive technical support for educational institutions and individual customers.
As a seller specializing in educational technology, Robocraze offers genuine products, expert guidance, and local warranty support that ensures your 3D printing journey starts with confidence and continues with reliable backing.


