Drone Transmitter and Receiver Guide
Summary
The proper pairing of a drone's transmitter and receiver is pivotal in determining the success or failure of a drone. Failure to choose the right combination can result in a disastrous outcome.
As a seasoned pilot or a fledgling enthusiast, it is imperative to be informed on the key features to consider in selecting the right drone transmitter and receiver.
This guide delves into the intricacies of frequency, range, and control options, offering a comprehensive overview to help make a well-informed decision.
Make no mistake, the choice of a drone transmitter and receiver can mean the difference between a seamless flight and a catastrophic crash landing! Don't risk flying blind, arm yourself with the knowledge to make the right choice.
Drones have become a hot topic these days and with new innovations in every electronic component it uses, the future of drones is indeed bright. One of the essential equipment needed to control a drone is the drone's radio transmitter and receiver.
Drone transmitters and receivers should be among the first components to purchase. It can be confusing to know which ones to buy. Alternatively, you can spend a little more on a good quality radio transmitter and receiver as it will last for years to come.
This guide explains the basics of radio transmitters and receivers and all the parameters to keep in mind when buying.

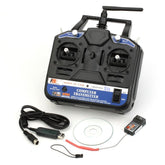
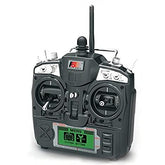
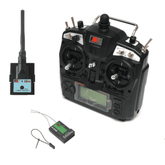
Get FlySky FS-CT6B Transmitter & Receiver
Drone Transmitter
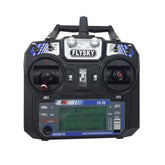
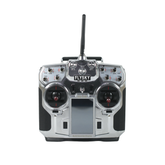
The Transmitter is an electronic device that uses radio signals to transmit commands wirelessly via a set radio frequency over to the Radio Receiver, which is connected to an aircraft or multirotor being remotely controlled.
In other words, it’s the device that translates pilot’s commands into movement of the multirotor.
read more : Drone Part List
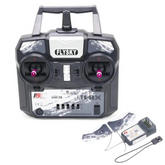
Grab the FlySky FS-i6 transmitter and receiver at an unbeatable price!
Drone Receiver
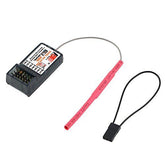
A radio receiver is a device capable of receiving commands from a radio transmitter, interpreting the signal through the flight controller, where these commands are translated into specific actions to control the aircraft.
- Telemetry (sending data back to transmitter)
- Redundancy function (two receivers connected, if one loses connection, second one takes over)
- Easily removable antennas (more convenient with connectors if antenna is to be replaced)
- Possibility of firmware upgrades (for bug fixes)

read more : How drone works?
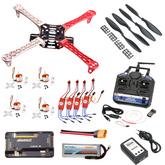
Check out our best DIY Drone Kit with camera and WIFI.
Look out our Drone Remotes for various collections.
How to pick the right Transmitter
Your drone transmitter will read your stick inputs and send them through the air to your receiver in near real time.
Once the receiver has this information it passes it on to your drone’s flight controller which makes the drone move accordingly. Hence it is important to pick the right transmitter.
Gimbals:
Gimbals are sticks that translate the pilot's input into digital data that is transmitted to radio receivers.
There are two types of Gimbals commonly used:
- Hall Effect Gimbal (digital)
- Potentiometer type Gimbal (analogue)
Hall Effect gimbals use hall sensors with magnets to capture the stick position values and is therefore more resistant to wear. These gimbals are also more precise.

read more : Speed Control of DC Motor
Gimbal Stick Ends are made of M3 or M4 thread, allowing you to attach different types of clubheads. Pilots who prefer to fly the "Pinch" method may prefer a different type of stick than pilots who prefer to fly with their thumbs.
Generally, the rods are about 25 to 27 mm long. They can be adjusted to personal preference.

Switches:
Transmitters don't just have gimbals they usually have an array of switches that you can use to activate and change flight modes and more.
The switches come in the form of two and three positions as well as sliders I recommend getting a radio with four configurable switches that will cover everything you could possibly need.

Unmanned radio transmitters transmit commands over channels. Each channel is an individual action sent to the aircraft. Throttle, Yaw, Pitch and Roll are the four main inputs required to control the quad. Each of these uses one channel, so a minimum of four is required.
Each switch, slider, or button on the transmitter uses a channel to send information to the receiver. Here is an example of a typical channel setup for a quadcopter includes a switch to equip the aircraft, a switch to activate the buzzer and a switch to select different flight modes.
For this reason, a 6-channel radio is recommended. Basic 4 or 6 channel radios are usually the cheapest. Radios with more than 6 channels are usually more expensive. Here is a below image of a 5-channel receiver

read more : How to fly a quadcopter
Modes:
When purchasing a Drone radio transmitter, you need to determine which "mode" you prefer to use in flight.
The aircraft motion determination mode is assigned to a given rod movement. There are 4 transmitter modes with mode 2 being the most common and usually set as the default mode on most radios.
Once you've adapted to a particular mode, it will be hard for your muscles and brain to switch modes! If you choose a more exotic mode, don't worry, it's your preference and won't affect anything else. Many radios allow you to the change the gimbal.

Radio Frequencies:
Radio transmitters typically use the following frequencies:
- 27 MHz, 72 MHz, 433 MHz, 900 MHz, 1.3 GHz, and 2.4 GHz
- 433Mhz, 900Mhz and 1.3GHz are commonly used in long range FPV and RC systems.
- 27Mhz and 72Mhz are older frequencies that have been used for years in RC. Equipment operating on these frequencies used crystals to link the transmitter to the receiver. Apart from some RC toys still available in the market, they are rarely used.
- 2.4 GHz is the most common frequency. This is a newer technology, and it provides "frequency hopping" that allows to manage the frequency transmission of multiple users at the same time. This is done by scanning the frequency band and finding the best available channel during transmission. The 2.4 GHz antenna is also very compact. In general, the lower the frequency, the larger the antenna. For this reason, 2.4 GHz quickly became the "Highly-Used" frequency.
read more : Where to Buy Drones in India
Communication Protocol
Different stations speak their own languages to speak to their receivers, with some being faster and others more reliable or even smaller/cheaper.
This means that you must use a receiver that is compatible with your transmitter, which is most likely made by the same brand.
After the receiver has a signal, it needs to communicate with the flight controller. Different stations have different protocols for this, and it's important to make sure your flight controller and software support this.
Some standard protocols include:
PWM - This is your classic analog with a separate wire for each channel. This is now slow and should be avoided if possible.
PPM - This is a slightly improved version of PWM where all channels are sent over a wire as a sequence of timed pulses. It's faster than PWM but still not the best choice.
Digital Protocol (SBUS, IBUS, DSM2/X) - Instead of relying on timing of different pulse widths, digital signals send numbers in the form of 1s and 0s, resulting in perfect accuracy with even faster response times.
Range Technology:
Range limitation is usually where the receiver can no longer clearly hear what the transmitter is telling it and is usually within 1 km under normal conditions.
Imagine you are trying to talk to someone in a field. The range of your radio link will depend on several factors:
- Your Transmitter Output Power - Many operate just below the legal maximum to comply with international standards.
- Receiver Sensitivity - A more sensitive receiver is like hearing better, the signal travels farther but can pick up more noise under certain conditions
- Quality of your antenna on both ends - The antenna itself can be a whole thing, but a larger antenna sends and receives a better signal. Usually, optimizing your antenna placement makes a big difference in system performance.
read more : How to make quadcopter using Arduino
How to Pick the right Receiver:
Receiver protocol:
Radio communication protocols can split into two groups:
- TX Protocols between Radio Transmitter and Radio Receiver.
- RX Protocols between Radio Receiver and Flight Controller
TX Protocols are in most cases specific to brands:
- FrSky: D8, D16, LR12
- Spektrum: DSM, DSM2, DSMX
- FlySky: AFHDS, AFHDS 2A
- Futaba: FASST
- Hitec: A-FHSS
- Devo: Hi-Sky
As for RX Protocols, some of them are universal:
- PCM, PWM, PPM, SBUS
However, there are also brand specific ones:
- TBS: CRSF Crossfire
- Graupner: SUMD, SUMH
- FrSky: FPort
- Multiwii: MSP
- Flysky: IBUS
- JR: XBYUS
The receiver must be compatible with the radio transmitter, which in most cases means that the same brand of Rx and Tx must be purchased to establish communication.
However, there are radio receivers that can work with the same protocol but not the same brand. The frequencies must also be the same on Rx and Tx. For example, 2.4 GHz transmitter can only work with 2.4 GHz radio receiver.
read more : Drone Motor – Where to Begin?
Receiver Antennas
Receiver antennas are usually soldered directly to the main receiver board or attached using a U. FL connector.
The antenna is made from coaxial cable where the main wire is separated from the "ground". Radio receivers are usually manufactured with two antennas to ensure the best reception.
The main wire is the active element of the antenna that receives radio signals over a specific frequency. The length of the active element is frequency dependent and is exactly 1/4 of the wavelength for a particular frequency.
The length of the antenna wire is not fixed; only active elements must have a specific length. For example, the wavelength to transmit 2.4 GHz is 122 mm. 1/4 of that is 30.5mm for the active element.
Receivers usually come with two antennas for the 2.4 GHz frequency. For best signal reception, it is recommended to keep them at a 90-degree angle to each other when installed on a multirotor.

Radio reviver sizes
Radio receivers come in many different sizes and shapes. Smaller receivers usually have Molex connectors while larger receivers have solder pins.
Smaller receivers are more practical for smaller all-in-ones, where mounting options for hardware are very limited. Larger receivers with latches can be used in larger multi-motor builds.
Tx/Rx binding:
The radio transmitter will only communicate with the radio receiver if the two are linked together. This process may vary on specific receivers and stations.
Usually this can be done by starting the binding process on the radio and pressing the BIND button on the receiver. It's best to consult the manual for your Rx and Tx combination.
It is important to note that a single radio transmitter can be linked to several different receivers. At the same time, a receiver can only link to one transmitter, not multiple transmitters.
read more : Affordable Drone Batteries
Telemetry
Telemetry is data transmitted from a radio receiver to a radio transmitter. Relays important information such as battery voltage and signal strength.
This information can be displayed on the screen or read aloud by the remote control to warn you when landing or when you are out of range.
Reading this message is obviously great because you can focus on flying and won't miss any warnings that could get you into trouble. It usually contains a variety of information, depending on the type of radio and flight controller.
The most important information is the battery voltage reading, current consumption and "RSSI" (radio signal strength indicator).
This telemetry data can be displayed on the telemetry screen (in OpenTX) and can also be customized as an audible alarm.

Conclusion
In this blog post, we have learnt that the role of drone transmitters and receivers in the seamless operation of drones cannot be overstated!
These integral components enable remote pilots to exert control over their drones, as well as facilitate the reception of flight commands and the transmission of critical flight information to the controller.
In the selection process of a transmitter and receiver, it is imperative to examine crucial aspects such as range, compatibility, and ease of use. With a competent transmitter and receiver in tow, you can bask in the glory of an exceptional drone flying experience.
Hence, if you are a professional drone operator or just seeking some thrilling aerial adventures, make sure to arm yourself with a robust transmitter and receiver to maximize your drone's potential!
If you appreciate our work don't forget to share this post and leave your opinion in the comment box.
Please do check out other blog posts about Drone Part List , Best Flight Controller for Drone , Drone motors and WHY DRONE IS MORE THAN A HOBBY
Make sure you check out our wide range of products and collections (we offer some exciting deals!)
Excerpt
Frequently Asked Questions
1. What is transmitter and receiver in drone?
A drone's transmitter, also known as the remote control or controller, is the device used by the pilot to control and navigate the drone. It sends commands wirelessly to the receiver, which is located on the drone itself. The receiver decodes the commands and sends them to the drone's onboard computer for execution. This communication between the transmitter and receiver allows the pilot to control the drone's flight, camera, and other functions.
2. Do drones use WiFi or radio?
Drones can use both WiFi and radio frequency (RF) for communication. The choice between the two often depends on the specific model and intended use of the drone. WiFi is typically used for shorter-range, consumer-grade drones, while RF is used for longer-range, industrial-grade drones that require a stronger and more stable connection. However, it's important to note that drones also use other wireless technologies like GPS and cellular connectivity for navigation and location tracking purposes.
3. Do drones use RF signals?
Yes, drones utilize RF (Radio Frequency) signals for communication and navigation. The RF signals are utilized for exchanging information between the drone and the remote controller, GPS and other related components, allowing the drone to accurately locate its position and receive commands. The drone's flight controller depends on these signals to perform stable flight operations and ensure safe navigation. To summarize, RF signals play a crucial role in the functioning of modern-day drones.
4. What is a transmitter and receiver in a drone?
A transmitter sends control signals from the pilot to the drone, enabling it to respond to commands. The receiver, located in the drone, captures these signals and translates them into actions like movement or orientation. Together, they facilitate real-time communication, ensuring smooth operation during flight.
5. How does a drone transmitter communicate with a receiver?
The transmitter communicates with the receiver using radio waves, usually on specific frequencies. When the pilot pushes a control stick, the transmitter encodes this command into a radio signal, which the receiver then decodes and executes, controlling the drone's motors and sensors accordingly.
6. What frequency do drones use?
Drones typically operate on 2.4GHz or 5.8GHz frequencies. The 2.4GHz band is popular for control and telemetry, offering a good range. Meanwhile, the 5.8GHz band is often used for video transmission, providing higher quality but shorter range due to increased susceptibility to obstacles.
7. How do I pair a transmitter with a receiver?
To pair a transmitter with a receiver, turn on both devices and ensure they are on the same frequency. Follow the pairing instructions specific to your models, usually involving pressing a bind button on the receiver while activating the transmitter. Once paired, they should be able to communicate seamlessly.
8. What is the range of a drone transmitter?
The range of a drone transmitter can vary widely, typically between 1,000 to 5,000 meters depending on the model and environmental factors. High-end drones may reach even further. Always check the specifications of your particular transmitter for the best performance details.
9. What is 2.4GHz and 5.8GHz in drone control?
2.4GHz is a common frequency used for drone control and telemetry, providing extended range and better penetration through obstacles. 5.8GHz, on the other hand, is primarily used for video transmission, offering higher quality but often with a reduced range compared to 2.4GHz. Both frequencies can be used effectively depending on the application.
10. Can I use any receiver with my transmitter?
No, you cannot use just any receiver with your transmitter. Compatibility is key; both devices must support the same protocol and frequency. Always consult the manufacturer’s specifications to ensure your transmitter and receiver can work together seamlessly.
11. What happens if transmitter signal is lost?
If the transmitter signal is lost, the drone will often execute a pre-programmed fail-safe action. This may include hovering in place, returning to the takeoff point, or landing automatically, depending on its settings. This safety feature protects your drone from crashing or becoming uncontrollable.


