Build Your Security Camera Using ESP32-CAM: A Step-by-Step Guide
Summary
In the world of DIY electronics, few projects are as rewarding as creating your own security camera system. The ESP32-CAM is a versatile and affordable option that allows you to build a custom security camera with ease. Whether you're looking to monitor your home, keep an eye on your workshop, or just dive into a fun project, this guide will walk you through the process of setting up your ESP32-CAM as a security camera.
Episode EE02

Read this blog to know All about ESP32 Camera Module in detail.
Hardware required
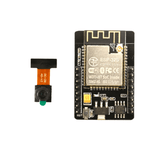
- ESP32-CAM Module: This compact board features a built-in camera and Wi-Fi capabilities.
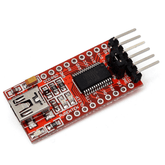
- FTDI Adapter: For programming the ESP32-CAM, you'll need an FTDI adapter or a similar USB-to-Serial converter.
- Jumper Wires: For connecting the ESP32-CAM to the FTDI adapter.
- Power Supply: A stable 5V power source.
- MicroSD Card: For storing images and video recordings (optional but recommended).
- Breadboard and Wires: For prototyping and connections.
Read now: Fire Detection And Notification Alarm using Arduino
Steps to Making Security Camera Using ESP32-CAM:
Step 1: Setting Up the Hardware

1. Connect the ESP32-CAM to the FTDI Adapter:
- TX on FTDI to U0R on ESP32-CAM.
- RX on FTDI to U0T on ESP32-CAM.
- GND on FTDI to GND on ESP32-CAM.
- 5V on FTDI to 5V on ESP32-CAM.
- IO0 on ESP32-CAM to GND (this sets the module to programming mode).
2. Insert the MicroSD Card (if using): Make sure it's formatted to FAT32.
3. Power Up: Connect the FTDI adapter to your computer via USB.
Step 2: Installing the Necessary Software
1. Install Arduino IDE: Download and install the Arduino IDE from the official website.
2. Add ESP32 Board Support:
- Open the Arduino IDE and go to File > Preferences.
- In the Additional Board Manager URLs field, enter https://dl.espressif.com/dl/package_esp32_index.json.
- Go to Tools > Board > Boards Manager, search for ESP32, and install the package.
3. Select the ESP32-CAM Board:
- Go to Tools > Board and select AI Thinker ESP32-CAM.
4. Install the Required Libraries:
- Open Sketch > Include Library > Manage Libraries.
- Search for and install the ESP32 and ESP32 Camera libraries.
Step 3: Uploading the Code

1. Download Sample Code: You can use the sample code provided by the ESP32 library or modify it according to your needs. Here’s a basic example for streaming video:
#include "esp_camera.h"
#include

// Replace with your network credentials
const char* ssid = "YOUR_SSID";
const char* password = "YOUR_PASSWORD";

// Replace with your network credentials
const char* serverName = "http://your-server-url/upload";

// Camera configuration
camera_config_t config;
void setup() {
  Serial.begin(115200);
  WiFi.begin(ssid, password);
  while (WiFi.status() != WL_CONNECTED) {
    delay(500);
    Serial.print(".");
  }
  Serial.println("Connected to WiFi");

  config.ledc_channel = LEDC_CHANNEL_0;
  config.ledc_timer = LEDC_TIMER_0;
  config.pin_d0 = 5;
  config.pin_d1 = 18;
  config.pin_d2 = 19;
  config.pin_d3 = 21;
  config.pin_d4 = 36;
  config.pin_d5 = 39;
  config.pin_d6 = 34;
  config.pin_d7 = 35;
  config.pin_xclk = 0;
  config.pin_pclk = 22;
  config.pin_vsync = 25;
  config.pin_href = 23;
  config.pin_sda = 26;
  config.pin_scl = 27;
  config.pin_pwdn = 32;
  config.pin_reset = -1;
  config.xclk_freq_hz = 20000000;
  config.pixel_format = PIXFORMAT_JPEG;

  if (psramFound()) {
    config.frame_size = FRAMESIZE_UXGA;
    config.jpeg_quality = 12;
    config.fb_count = 2;
  } else {
    config.frame_size = FRAMESIZE_XGA;
    config.jpeg_quality = 12;
    config.fb_count = 1;
  }

  esp_err_t err = esp_camera_init(&config);
  if (err != ESP_OK) {
    Serial.printf("Camera init failed with error 0x%x", err);
    return;
  }
}

void loop() {
  camera_fb_t *fb = esp_camera_fb_get();
  if (!fb) {
    Serial.println("Camera capture failed");
    return;
  }

  // Upload to server or save to SD card

  esp_camera_fb_return(fb);
  delay(10000); // Wait 10 seconds before capturing next frame
}

2. Upload the Code: Within the Arduino IDE, click the upload button. Once done, disconnect the IO0 pin from GND and press the reset button on the ESP32-CAM.
Also read this blog to learn How to Build a Smart Laser Security System using a Laser Diode, LDR, and ESP32 or Arduino UNO Board
Step 4: Accessing the Camera Stream
- Find Your IP Address: Open the Serial Monitor in Arduino IDE to find the IP address assigned to your ESP32-CAM.
- View the Stream: Open a web browser and enter the IP address. You should see the live video stream from your ESP32-CAM.
Step 5: Advanced Features
- Motion Detection: Implement motion detection by comparing consecutive frames to detect changes.
- Email Alerts: Configure your ESP32-CAM to send email alerts when motion is detected.
- Cloud Storage: Set up cloud storage solutions to automatically save images or video recordings.
Get started with facial recognition using the ESP32-CAM WiFi Module - Order Now!
Also read this blog about How to make a laser alarm security circuit on breadboard
Conclusion
Building a security camera using the ESP32-CAM is a fantastic project that combines hardware and software skills. With just a few components and some basic coding, you can create a powerful security system tailored to your needs. Explore advanced features and enhance your setup to make it even more functional and reliable. Happy building!
Please do check out other blog posts about Popular electronics
Check out other related blog posts about Drones: Drone transmitter and receiver , Drone motors and Getting started with a Quadcopter
Make sure you check out our wide range of products and collections (we offer some exciting deals!)
Excerpt
Frequently Asked Questions
1. How can I use the ESP32-CAM as a webcam?
You must install specific software on the ESP32-CAM in order to utilize it as a webcam and view videos via the internet. When it's prepared, you can use your computer or phone's web browser to view the video on your computer or phone by connecting it to your Wi-Fi.
2. Is the ESP32-CAM safe to use?
3.
Yes, the ESP32-CAM is safe. Make sure you follow the directions and supply the appropriate voltage (5V). In order to prevent unauthorized users from using your camera, be sure that your passwords and Wi-Fi are secure.
4. Can the ESP32-CAM work without Wi-Fi?
The ESP32-CAM can function without Wi-Fi, however it cannot transmit video to a computer or phone. It can still be used for basic functions that don't require an internet connection, including taking pictures.
5. Can the ESP32-CAM detect motion?
6. Does the ESP32-CAM have Bluetooth?
The ESP32-CAM can detect motion, yes, but it need assistance. It has two options: either attach a motion sensor to it, or utilize software to detect changes in the images it captures.
7. What do I need to build an ESP32-CAM camera?
To build an ESP32-CAM camera, you'll need the ESP32-CAM module itself, a USB-to-TTL converter for programming, jumper wires, and a power source—often a battery or USB adapter. Optionally, a breadboard and some resistors can help with connections if you're prototyping. This setup allows you to capture images and stream video effectively.
8. How to connect ESP32-CAM to Wi-Fi?
To connect your ESP32-CAM to Wi-Fi, open the Arduino IDE and install the ESP32 board library. Use the example sketch for "Camera Web Server." Update the Wi-Fi SSID and password with your network credentials. Upload the code to your ESP32-CAM, and it will connect automatically, allowing you to access the camera feed via a local IP address.
9. Can I view the camera feed on my phone?
Yes, you can view the camera feed on your phone. After setting up the ESP32-CAM and connecting to Wi-Fi, open a web browser on your phone and enter the local IP address provided in the serial monitor of the Arduino IDE. This allows you to stream live video directly on your mobile device.
10. How to record video from ESP32-CAM?
To record video from the ESP32-CAM, you can modify the existing Arduino sketch or use a separate application. The sketch can save frames to an SD card or send them to a server for storage. Alternatively, you can set up a server-side application that captures and stores the live stream as video files.
11. What power source does ESP32-CAM need?
The ESP32-CAM typically requires a power source of 5V and can be powered through its micro USB port or GPIO pins. A reliable power supply, such as a battery or USB adapter, is essential to ensure stable operation, especially during Wi-Fi transmission and video streaming.


