


Robocraze BEST PRICE GUARANTEED
Couldn't load pickup availability


Technical Support & Easy Returns
Raise a Ticket
Earn RC Coins on Every Purchase
Rewards

Cash on Delivery Available
Cash Delivery
COUPON
When you shop for ₹ 2500 or more.Applicable on Checkout.
*Coupons are not applicable on Original Boards and Kits
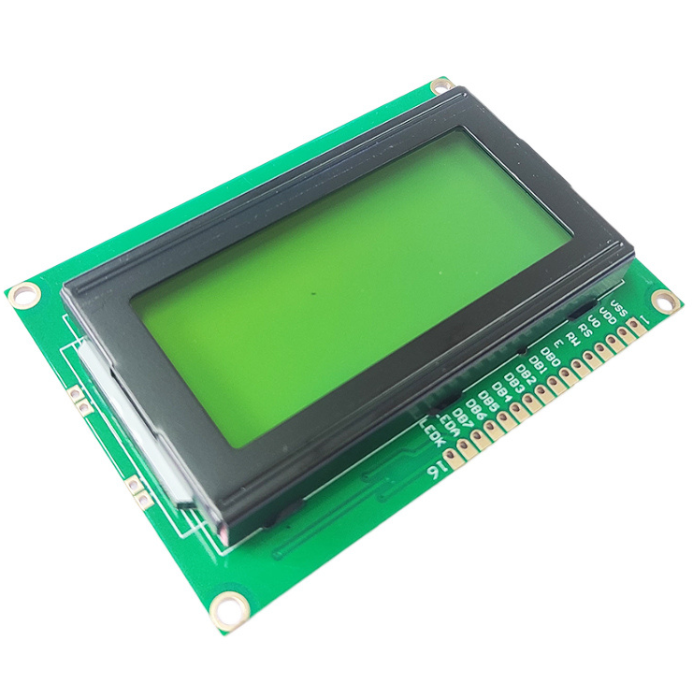
- This is LCD 16X4 Alphanumeric Display With Green Backlight
- This LCD Display have 16 Characters x 4 Lines
- This has 5 x 8 Dots with Cursor
- This LCD Display have Built-in Controller
- This requires +5v Power Supply (Also Available for +3V)
- This has 1/16 Duty Circle
16x4 LCD Display With Green Backlight
This is the 16x4 LCD Display, A display is required if you want to add visual output to your Arduino projects. If you only need a small amount of information displayed, the 16x4 LCD Display is a good choice. This 16x4 Parallel LCD Display is a simple and cost-effective way to incorporate a 16x4 RGB Liquid Crystal Display into your project. The display is 16 character by 4 line with very clear and high contrast black text against a Green background/backlight.
This is a fantastic Green backlit LCD display. It is ideal for Arduino-based projects. This 16x4 LCD Display with Green Backlight is extremely simple to connect to an Arduino or other microcontroller. The values displayed on the display can be simple text or numerical values read by the sensors, such as temperature or pressure, or even the number of cycles performed by the Arduino.
Features:
- Display: 16 characters per line, 4 lines
- Backlight: Green backlight that can be turned on or off
- Voltage: Operates on 5V
- Controller: Based on the HD44780 display controller, compatible with most microcontrollers
- Contrast Control: Adjustable by varying the voltage at the contrast control pin (Pin 3)
- Interface: Requires a minimum of 6 general I/O pins to interface
- Modes: Works in both 4-bit and 8-bit modes
- Applications: Ideal for displaying alphanumeric information in various electronic projects
Applications:
- Microcontroller Projects: Displaying text and numerical data in Arduino, Raspberry Pi, and other microcontroller-based projects.
- Industrial Control Systems: Providing real-time data and status updates in industrial automation and control systems.
- Medical Devices: Displaying vital information in medical equipment such as monitors and diagnostic devices.
- Home Appliances: Used in appliances like microwave ovens, washing machines, and refrigerators to show settings and status.
- Point-of-Sale Systems: Displaying transaction details and other information in retail and hospitality environments.
- Educational Tools: Used in educational kits and projects to teach electronics and programming concepts.
- DIY Electronics: Popular among hobbyists for various custom electronics projects.

Shipping & Returns
Shipping & Returns
- All orders confirmed before 3 pm IST are shipped on the
same day, barring rare pickup delays on holidays or disturbances - Delivery time in Metro cities is 1-3 days, Others it is
3-7 days. It varies based on location, reliant on courier services - Return window: 7 days from receipt unless stated
otherwise. No refunds/replacements after - Returns only for non-working/damaged products are accepted
- Initiate return requests to our customer service team via Support ticket or contact us at +91-8123057137
- Refunds are processed within 3-4 working days post inspection and approval.
For more details, please check our Shipping and Return Policy


People Also Buy

Original JHD 20x4 character LCD Display with Blue Backlight

128x64 Graphic LCD -Yellow Backlight

JHD 128x64 Graphic LCD -Blue Backlight
Found a better price?
Let us know!
We'll try to match the price for you
Package Includes:
- 1 x 16x4 LCD Display With Green Backlight
Specifications:
| Dot | 16 x 4 |
| Display Type | LCD Module |
| Colour | Green Backlight |
| Dimensions | 5 x 4 x 3 cms |
| Weight | 15 grams |
1. What is LCD display 16x4?
- The 16x4 LCD Display is a simple and cost-effective LCD display with 16 character by 4 line with very clear and high contrast. This 16x4 LCD is extremely simple to connect to an Arduino or other microcontrollers. The values displayed on the 16x4 LCD can be simple text or numerical values read by the sensors, such as temperature or pressure, or even the number of cycles performed by the Arduino.
2. How many columns and rows are present in 16x4 LCD?
- A 16x4 LCD (liquid crystal display) has 16 columns and 4 rows. The columns are the horizontal lines of pixels on the screen, while the rows are the vertical lines of pixels. The number "16x4" refers to the number of columns and rows on the LCD, respectively.
- In a 16x4 LCD, each character or symbol that is displayed on the screen is made up of a 5x8 grid of pixels. This means that each row of the LCD can display up to 16 characters, while the total number of characters that can be displayed on the screen at any given time is 4 rows x 16 columns = 64 characters.
3.How connect 16x4 LCD to Arduino?
- To connect a 16x4 LCD (liquid crystal display) to an Arduino, you will need to follow these steps:
- Gather your materials: You will need an Arduino board, a 16x4 LCD, a breadboard, and a set of jumper wires.
- Connect the LCD to the breadboard: Place the LCD on the breadboard and use jumper wires to connect the LCD's VSS, VDD, VO, RS, R/W, E, D4, D5, D6, and D7 pins to the breadboard.
- Connect the breadboard to the Arduino: Use jumper wires to connect the breadboard to the Arduino board. Connect the VSS and VDD pins of the LCD to the GND and 5V pins of the Arduino, respectively. Connect the VO pin of the LCD to a potentiometer, and then connect the other two pins of the potentiometer to the GND and 5V pins of the Arduino. Connect the RS, R/W, E, D4, D5, D6, and D7 pins of the LCD to the digital pins 2, 3, 4, 5, 6, 7, 8, and 9 of the Arduino, respectively.
- Upload the Arduino sketch: Use the Arduino Integrated Development Environment (IDE) to upload a sketch (a program written in the Arduino programming language) to the Arduino board. The sketch should initialize the LCD and display text or graphics on the screen.
4. How can I adjust the contrast of the display?
- The contrast can be adjusted by varying the voltage at the contrast control pin (Pin 3).
5. What are some common applications for this display?
- This display is commonly used in DIY electronics, embedded systems, and educational projects to show data and messages.
