Get Started With 3.5” LCD for Raspberry Pi
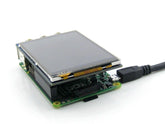
The 3.5 inch LCD Display is directly pluggable into a Raspberry Pi and perfectly fits various Pi models from B+ to Raspberry Pi 3B+. It is a brilliant alternative for an HDMI monitor. When set up, it behaves as a human-machine interface enabling the user to prototype with the Raspberry Pi device anywhere at any time.
Features:
- 480x320 hardware resolution with 8:5 aspect ratio
- Typical current consumption within 110-150 mA with a 5V supply
- High-quality immersion gold plating
- Resistive touch control
- Simple installation procedure described below
Installation:
It is very easy to set up the display by installing an LCD driver on your Raspbian OS. It requires only 3 commands to be run on the terminal.
After setting up your Raspberry Pi, connect the LCD Screen to your RPi as shown below
1. Display works on SPI communication protocol so you have to enable SPI interface
Menu>Preferences>Raspberry Pi Configuration>Interfaces; click ‘Enabled’ for SPI
Or
type sudo raspi-config in the terminal, go to Interfacing Options, select SPI and enable it, click on Finish to close the configuration menu
2. Restart your RPi to make sure that the configuration changes have been updated
3. Open the terminal by pressing Ctrl-Alt-T or by clicking on its icon located in the RPi taskbar at the top
4. Update your libraries, just for good practice
sudo apt-get update && sudo apt-get upgrade
5. Download the drivers from Github
git clone https://github.com/goodtft/LCD-show
6. Go inside the driver’s directory
cd LCD-show
7. List all the files in this folder to find the LCD35-show file (Just for good practice)
8. Convert the file into an executable using super-user
sudo chmod 755 ./LCD-show
9. Run the executable
sudo ./LCD35-show
(if the command is not being executed, run sudo chmod 755 ./LCD-hdmi)
10. RPi will restart after running the program and your LCD will display the desktop
11. Switching back to HDMI Monitor:
Check Out our Wide Range of Raspberry Pi Case.
If you want to switch back to an HDMI monitor from the LCD screen, the process is also very simple.
1. Every library also includes a file to revert back to HDMI
2. Go into the directory of the library
cd LCD-show
3. List all the files to find LCD-hdmi file
ls
4. Convert this file into an executable
sudo chmod 755 ./LCD-hdmi
5. Run the executable to view your Raspbian desktop from an HDMI monitor
sudo ./LCD35-hdmi
Like the previous time, Raspberry Pi will restart to switch to HDMI
We hope that this helps you, explore more and learn more.


